Introduction
I've been somewhere in between an "admin"/"homelabber" and an Apple fanboy for pretty much the entirety of the last decade. I've had iPhones, but at the same time I've had some type of home server running some basic homelab apps, like an SMB server for local file sharing, Plex, some VMs, a SQL Server Developer Edition for local development databases (I really hate setting up SQL, so having it just run on a server on my network is 10/10 preferable for me. Also bonus points because I can change PCs and my dev apps have all the same data). But, several years ago I made the switch from a basic Synology-style NAS setup, to just using an old Windows PC because the NAS system I was on got cryptolocked.
Luckily, I wasn't a complete "hope for the best" type of person with technology, and I did have a backup, but it was like 6 months old. So, after switching I wanted a decent backup strategy, which led me away from whatever version of Windows I had running on the PC, to using Unraid.
Why Unraid?
If you haven't heard of Unraid before, it's pretty awesome. I'm sure if you've landed here you have probably heard of RAID, but if you haven't — RAID allows you to take two or more hard drives, and either "stripe" or duplicate your data (or both) across those drives.
Using RAID, you either use a lot of extra drives, or you don't really have any backups. I've always wanted to do RAID, but the requirements were just... too expensive (I know, I know. Losing your data is ALWAYS more expensive than the HDDs would have cost, but I'm sure we've all been in the situation where it just doesn't FEEL worth it. You don't even get more space on your PC with RAID backups after buying another drive.)
And that's what really led me to Unraid. It has one mandatory parity drive. It has to match or exceed the size of any other drive in the system, but that's pretty much it. I put an 8 TB NAS drive as my parity, so I currently have 1 other 8 TB NAS drive, and 2 4 TB drives for a total accessible storage of 16 TB, and just 8 TB of parity. Pretty awesome, if you ask me.
Is that REALLY enough?
So, Unraid (and keeping everything up to date and not super internet connected) has made me feel A LOT better about the data I put on that server. However, there has always been in the back of my mind the worry about what if the entire server goes down, or gets hacked in some way.
Thanks to Unraid, my old external backup isn't big enough anymore for all my data. So I went ahead and bought two different backup drives. Well, three technically. I have 2 10 TB external HDDs, and a 1 TB external SSD. I decided I wanted my more important data on a solid state drive, so I didn't have to worry about it getting knocked around or anything like that. And if NAND flash prices ever go back down, I'll probably get another one, but for now 1 is fine.
For the 2 10 TB external HDDs, I decided I wanted to set those up as a rolling backup, so no matter what I always have 10 TB worth of data that is at least a month old. Ya know, just in case I don't find out that I have a virus until it's too late and the backup has already happened.
Maybe that's too much context, but that's what brought me to this point. So, let's get into how I actually decided to back up the data.
First, the code
Before anything else, here is a link to my actual scripts, in case that is all you're really here for. If you use these you'll have to adjust the drive and share names for sure, and maybe a couple other things. But your mileage may vary. At very least these should get you started though, and give you the general idea of what I'm doing.
Dependencies. Or something like that.
Before just backing up our data, it's a good idea to get the dependencies out of the way. There are lots of ways you could do this, but to me this way felt the most "Unraid" styled. Using plugins that run native Linux things in the background. So you get all the Linux-y goodness, but not very much of the CLI or terminal.
We'll need four plugins for our Unraid server. The first is Community Applications. This one basically lets us access the other ones easier. Then we need Unassigned Devices, and Unassigned Devices Plus. These two together let us plug in the external drive, give it a name and find it at a known location every time we plug it in without having to manually mount it through the terminal.

The fourth one we need is one that I hadn't installed yet, so it felt like it was worth walking through that process just in case you're not familiar with it.
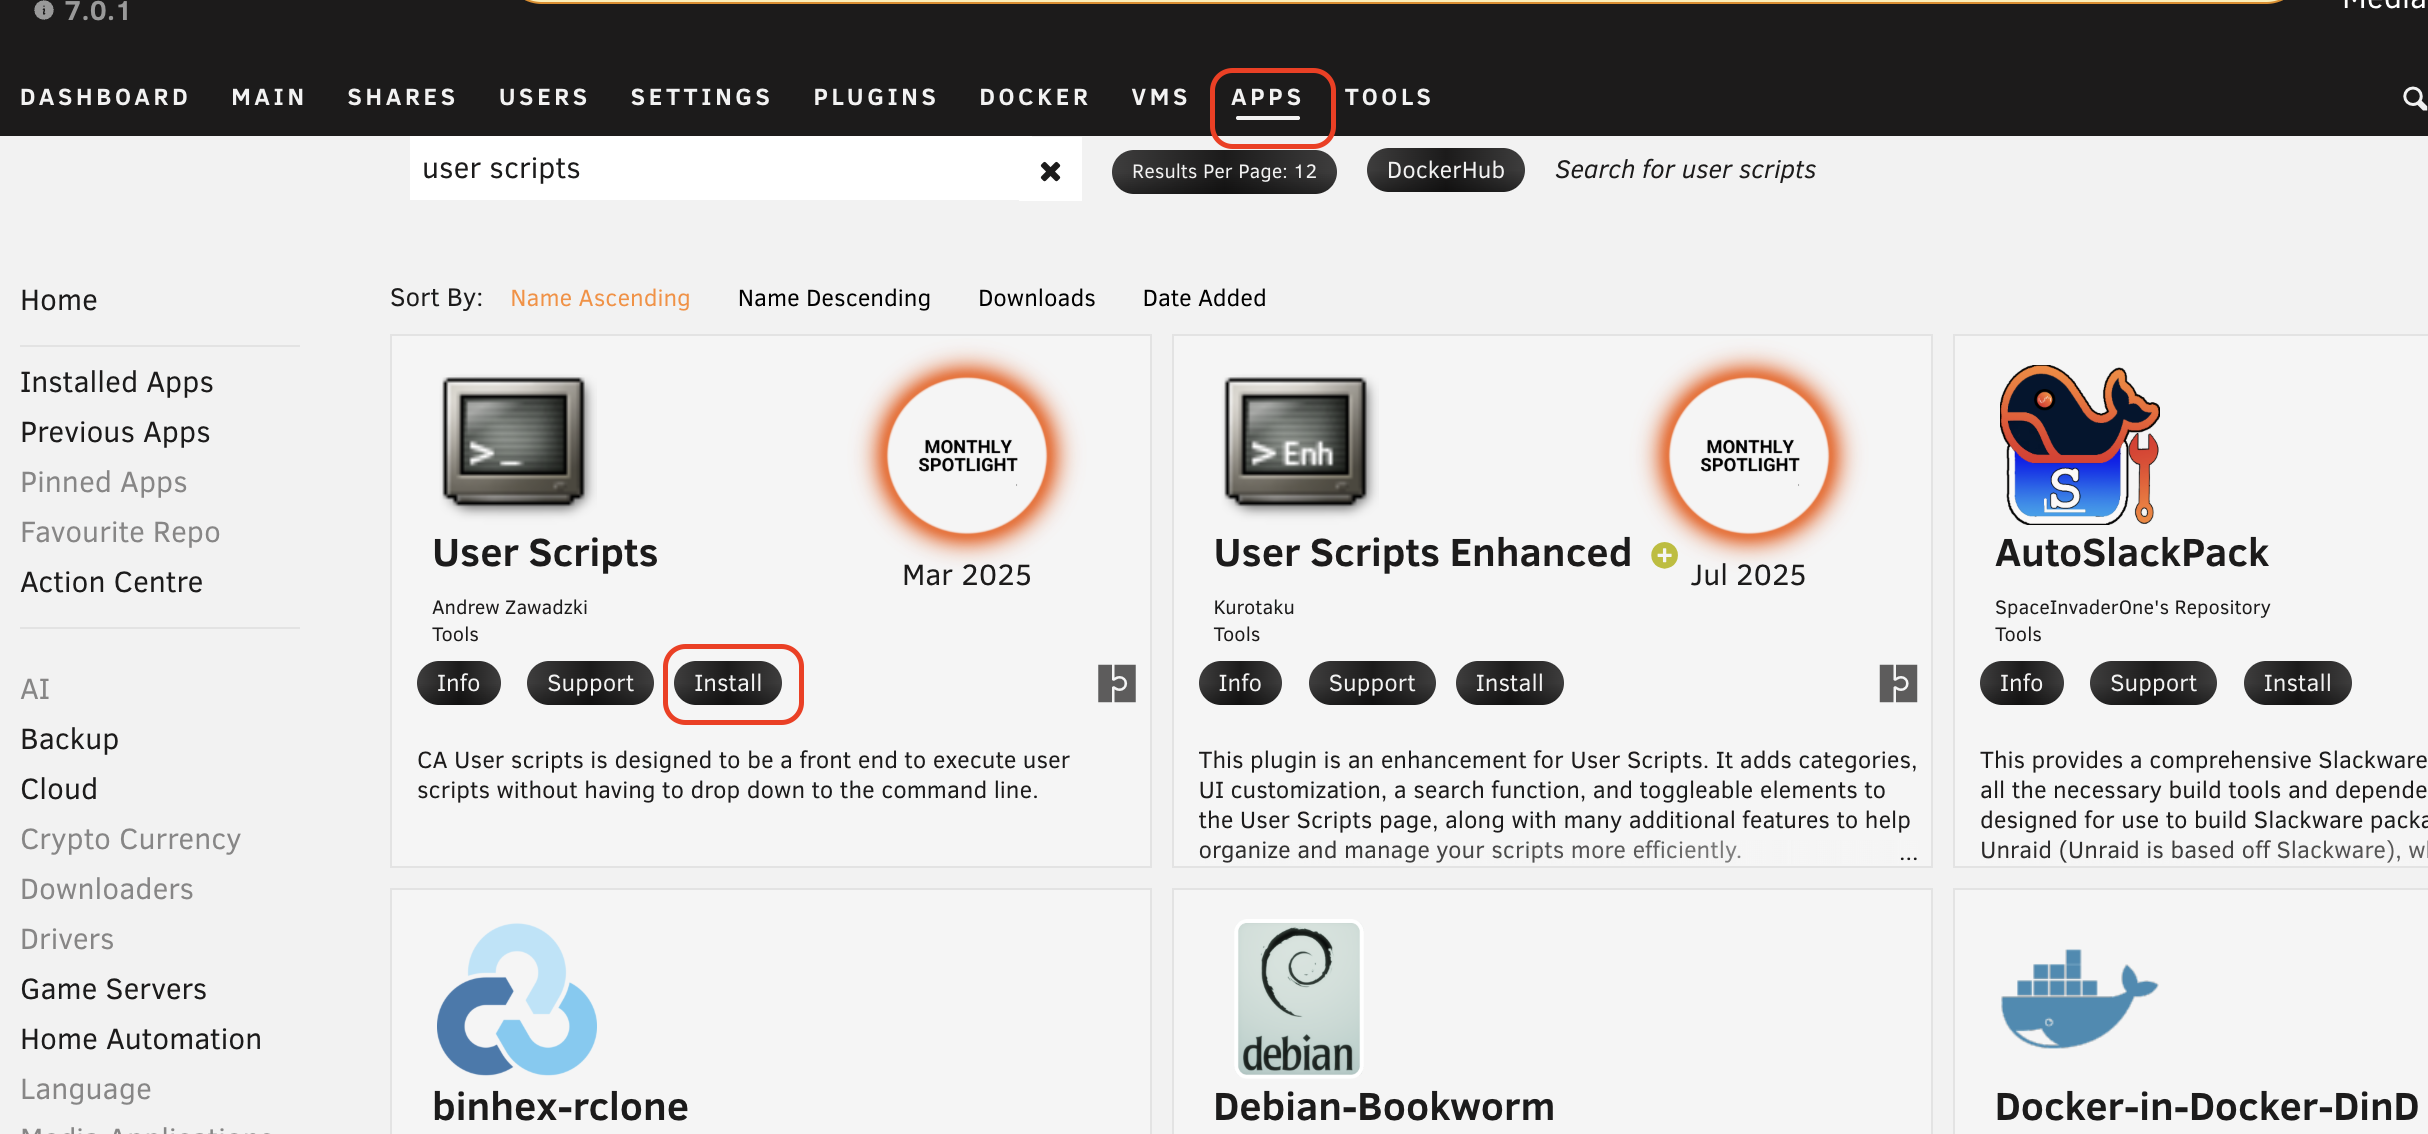
First, you click on Apps (you have to have Community Applications installed for the Apps menu to show up), and then search for the app you want. In this case it's User Scripts.
Then, you should see a list of the apps. You find the one you want and hit Install. And that's really it. Pretty awesome right? I love apt and snap and all that as much as the next geek, but it is hard to beat a good GUI.
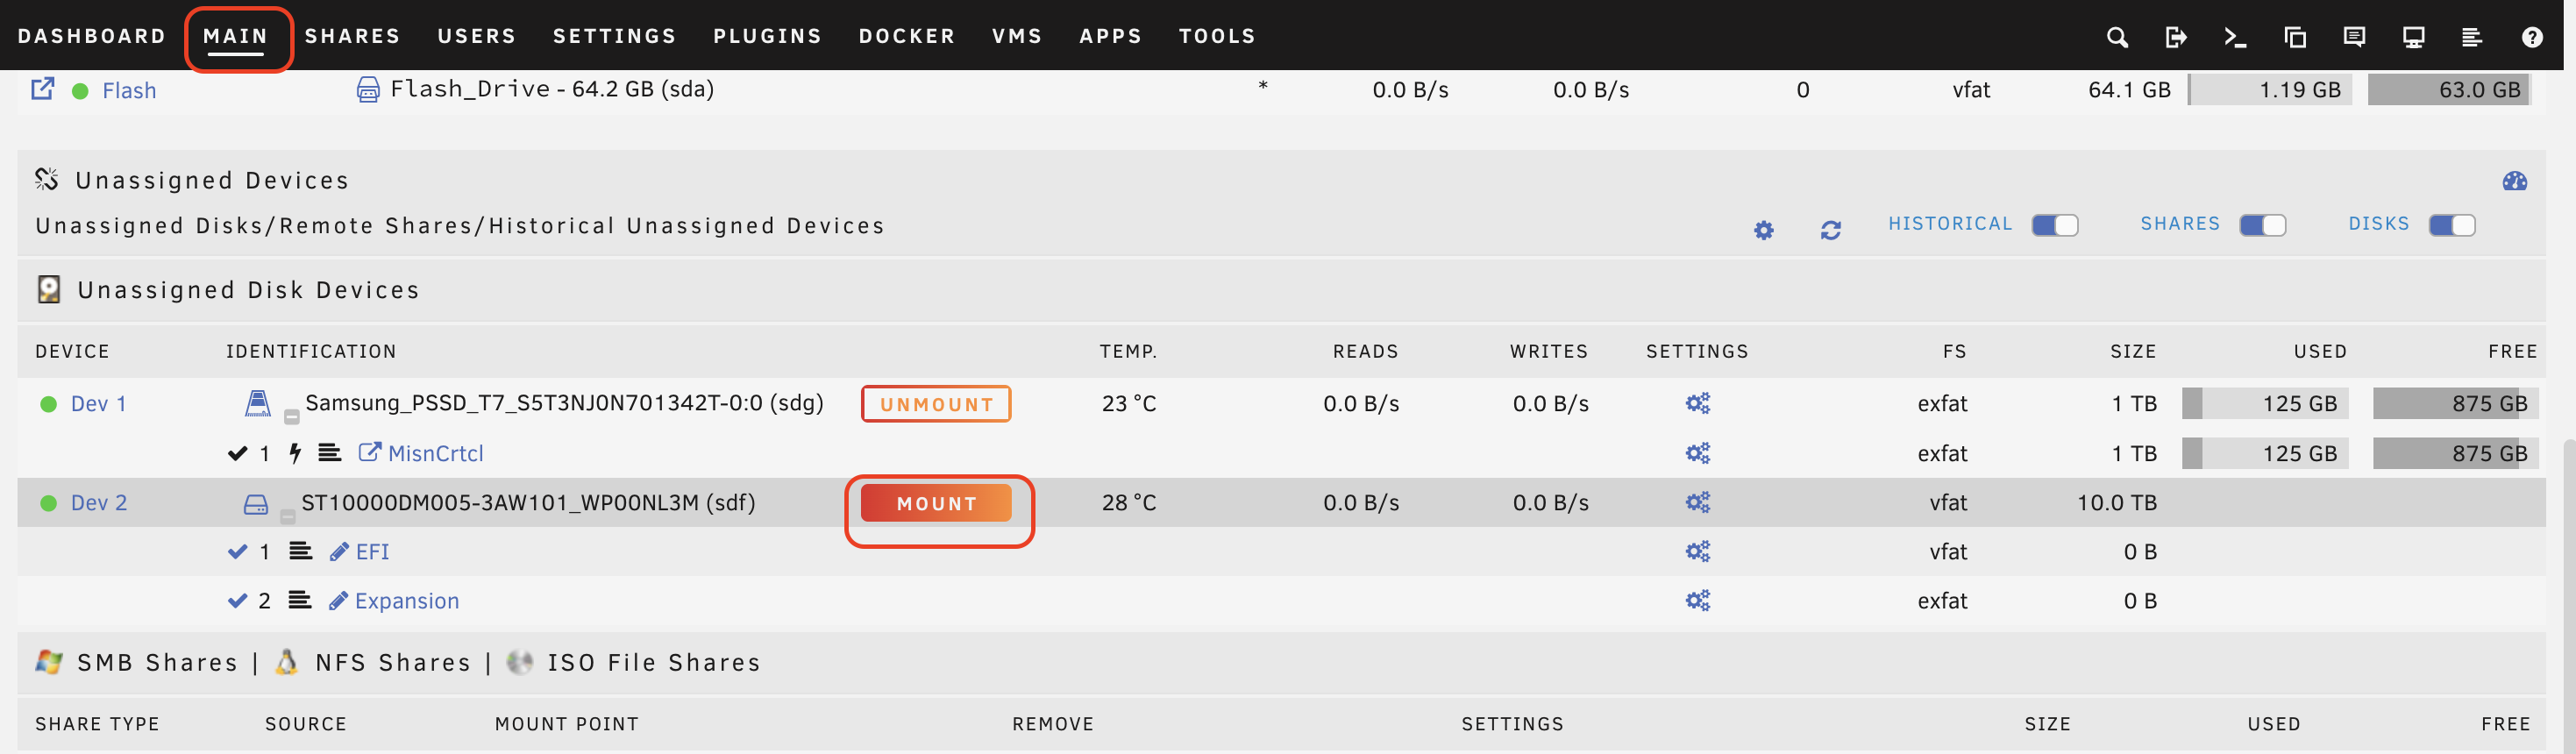
With all the apps set up, we just need to plug in the external drive and then go to the Main tab, and the Unassigned Devices section, and find the drive we plugged in. Before you mount it, if you want you can rename the partitions on your disk. We'll use whatever it's named here later in the scripts, so even if you don't change it, it's important to make note of what it is.
With that name noted, click Mount and the drive should then attach through the Unassigned Devices plugin.
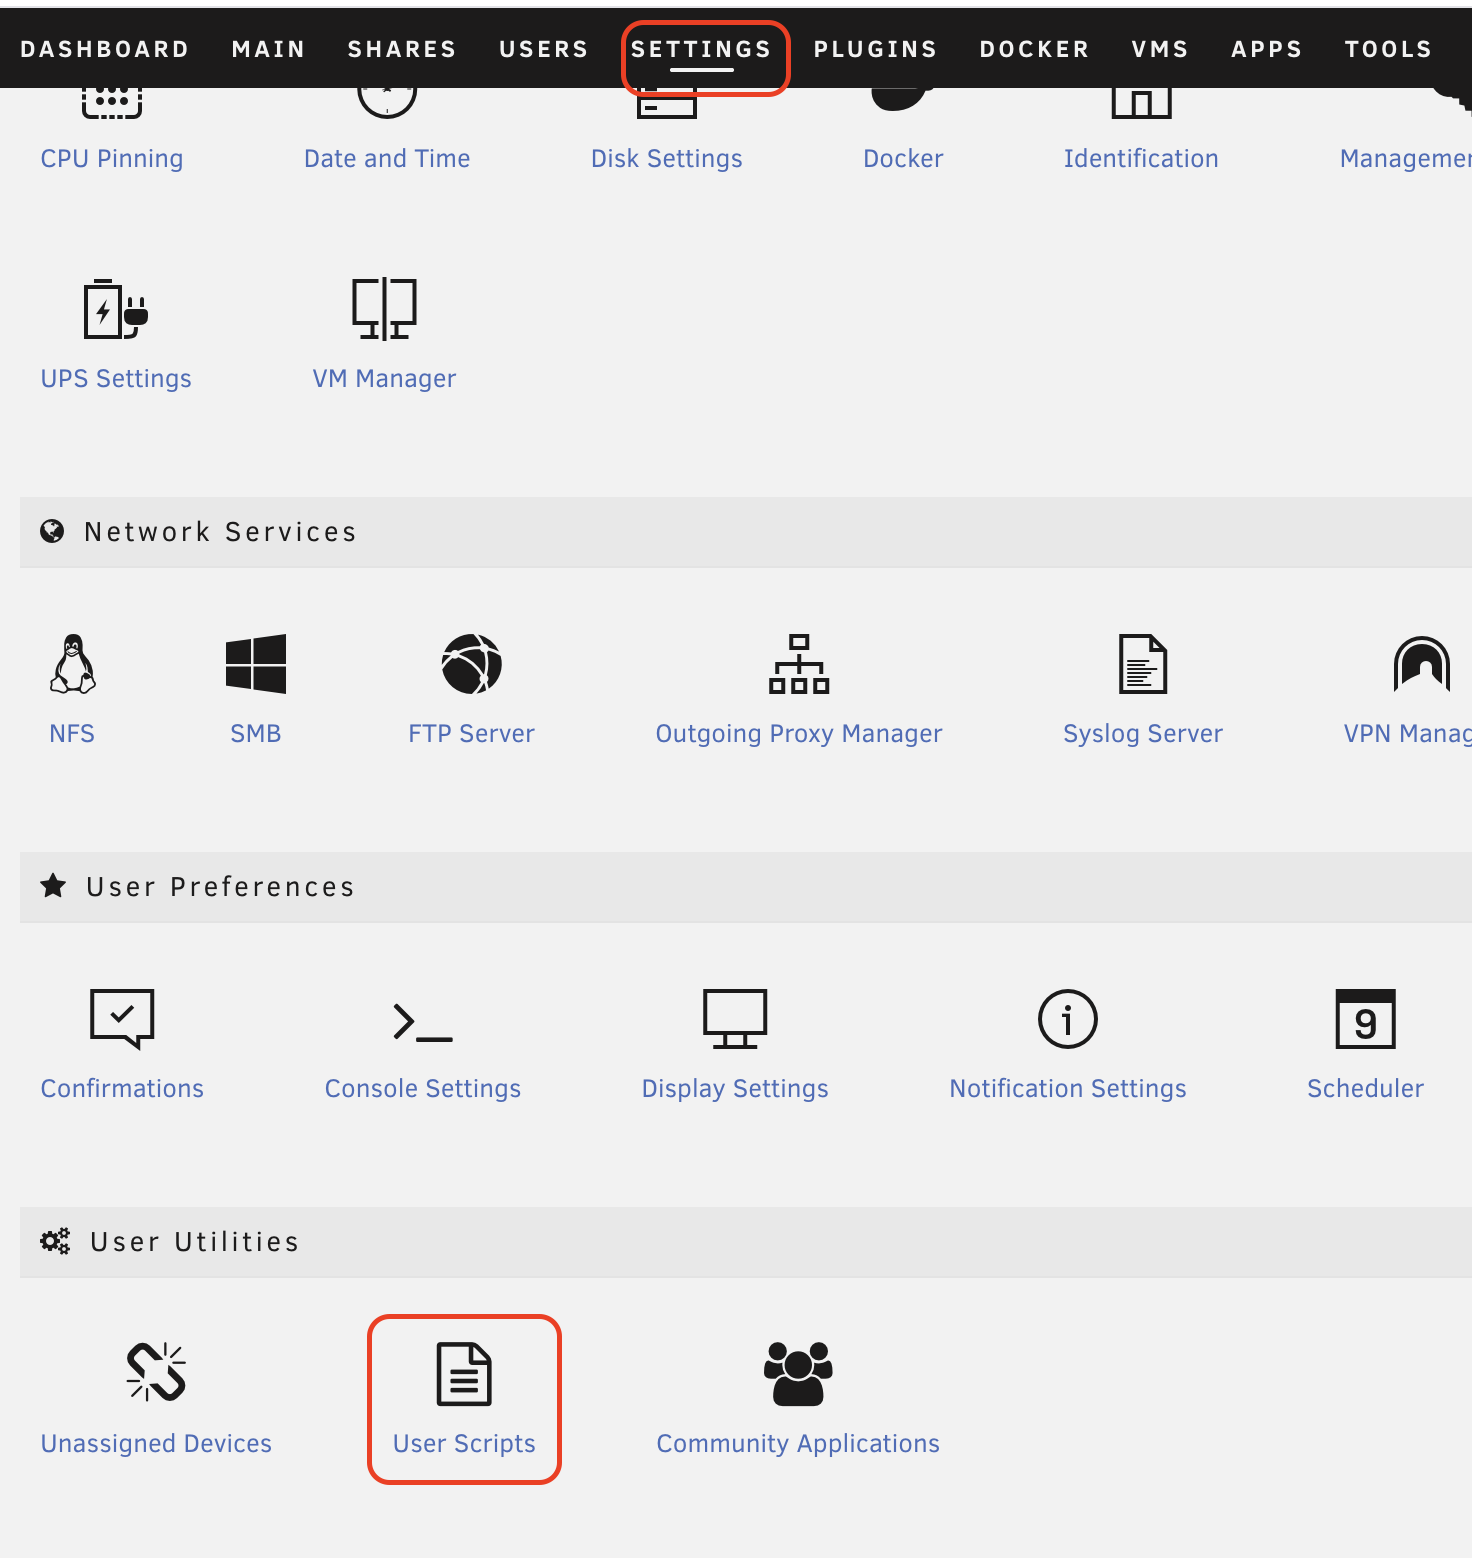
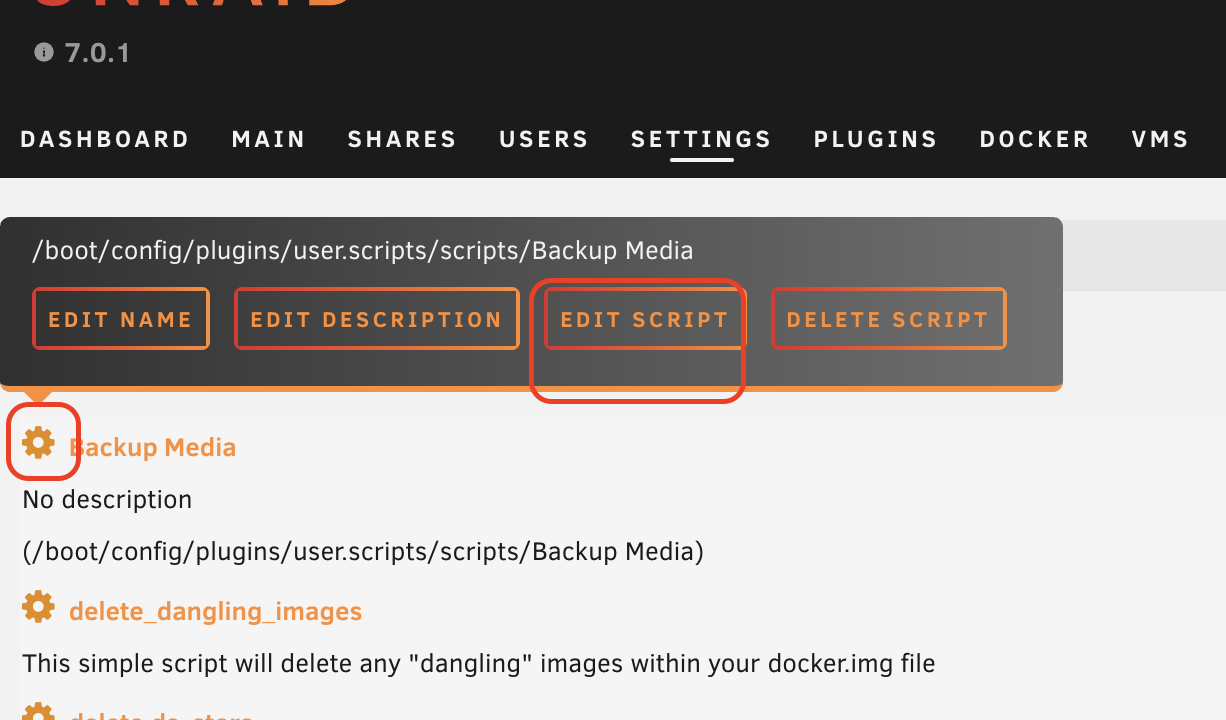
With the drive mounted, we need to find the User Scripts app so we can set up our user scripts (well named app, right?). To do this go to Settings, and scroll all the way to the bottom. I use this a lot, so I decided to "heart" it, which adds it to the Favorites menu (if you don't have any favorites, it doesn't show in the main menu, but once you "heart" one thing, it'll start showing).
With the User Scripts app open, we'll just hit Add New Script, and a new script should pop up.
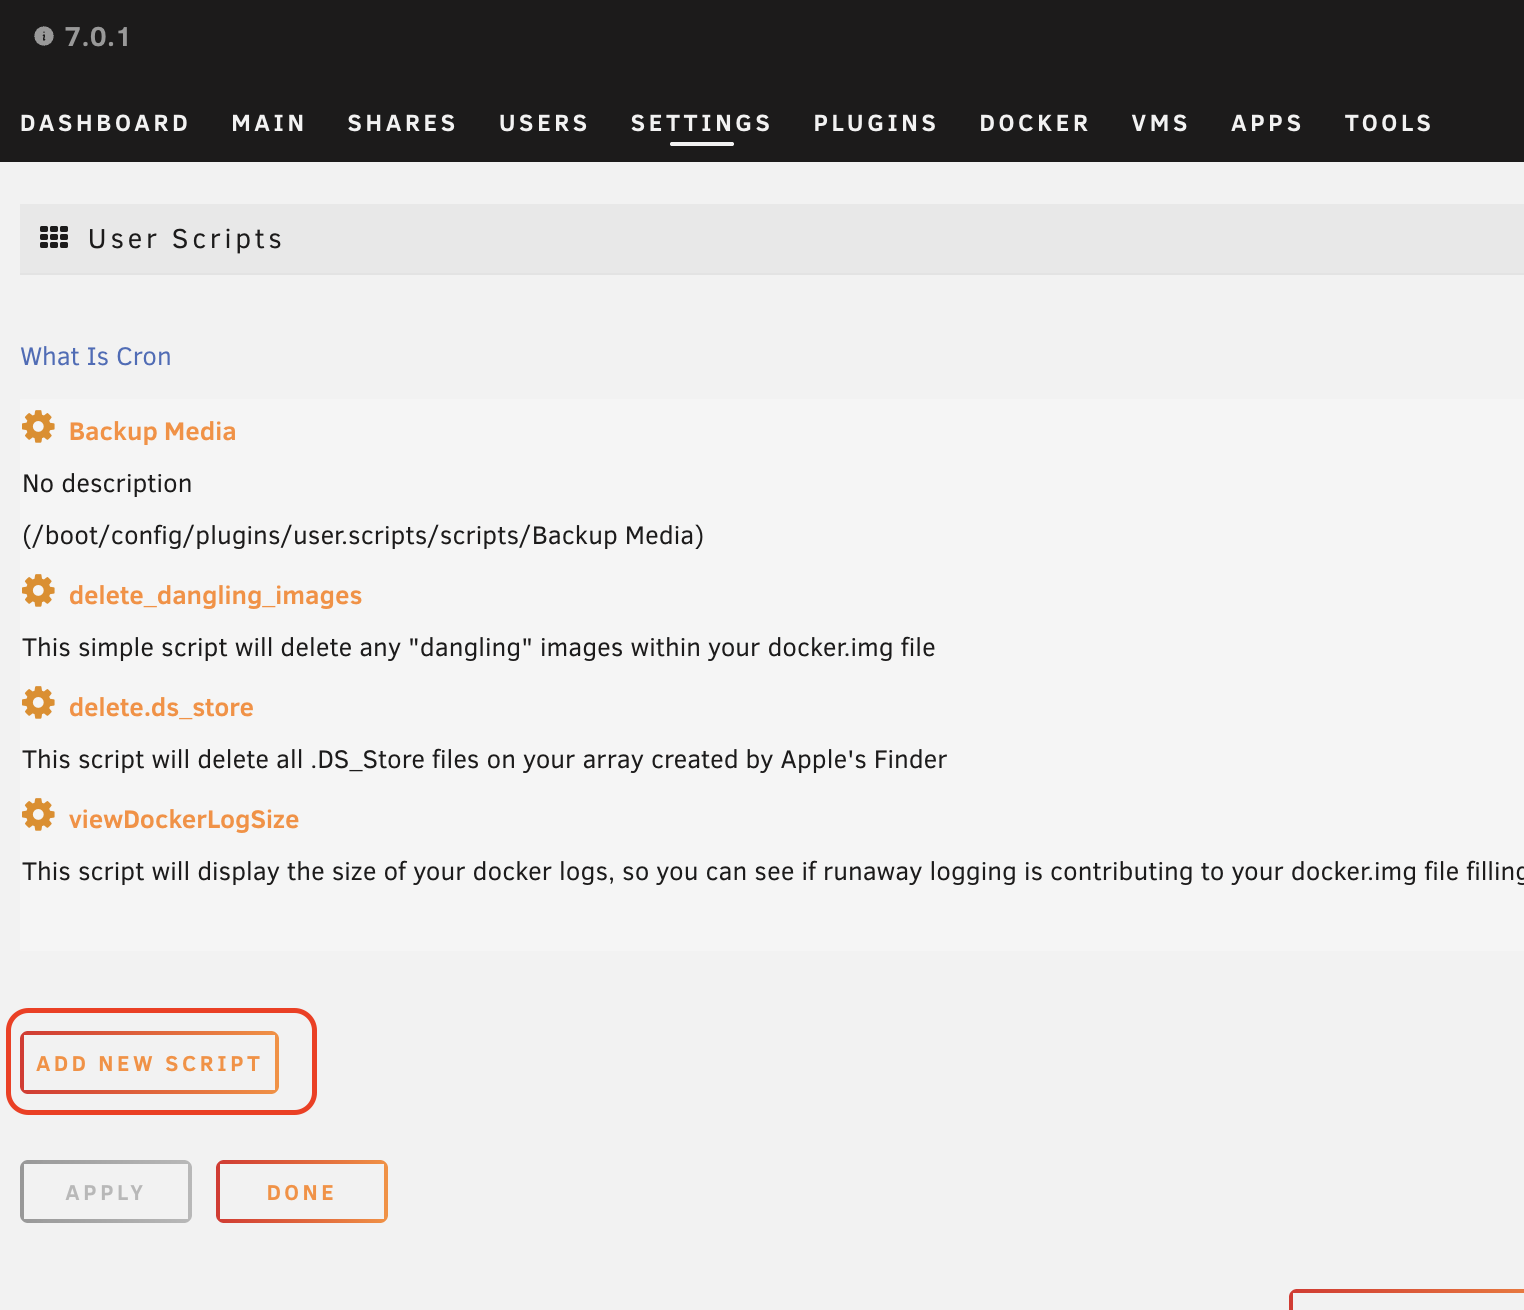
Then you can click the gear to give the script a name and description. Also under the gear menu, is the Edit Script button. We'll need to hit that to paste our script over from GitHub (again, the code is here)
Once the script is pasted in and edited to your liking (you'll notice in the screenshot below, I had a few more edits to make before publishing them to GitHub) you'll need to hit the Save Script button.
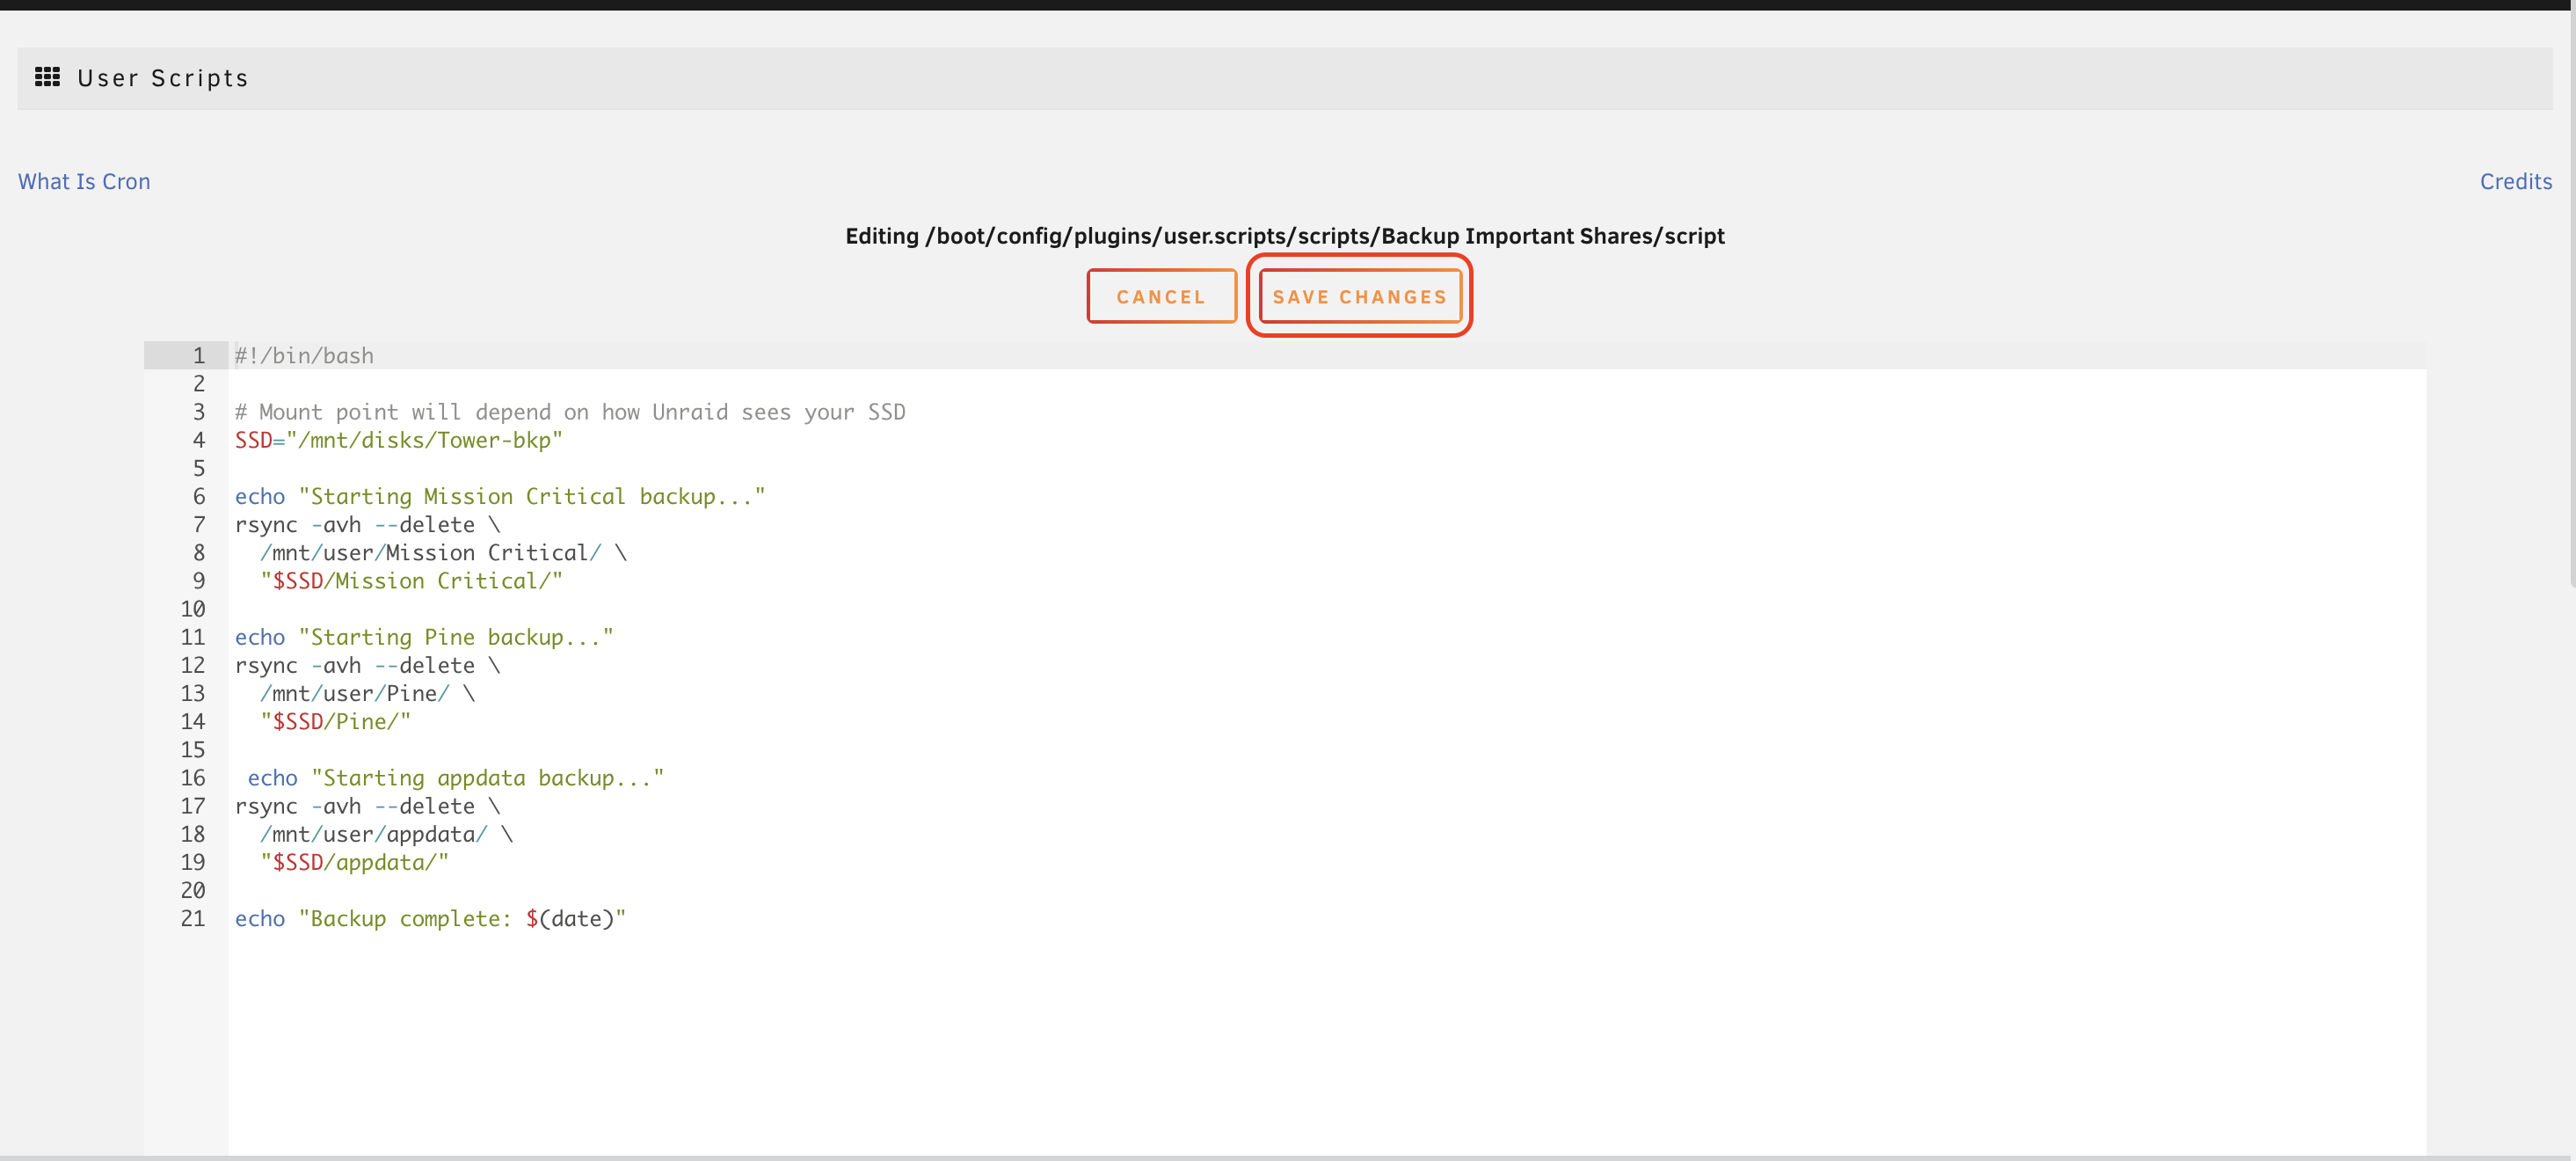
After that, just hit Run if you want to watch it the whole time, or Run in Background to have it just run in the background. You can still watch or abort the script, it just means that when you leave the page the script will still run. Which is a good idea for these larger backup scripts.

A few additional notes
This script uses rsync, with delete mode on. So in theory it should ONLY sync the changes, which is perfect for all of my shares. It's not going to copy all 8 TB or so every time, it's only going to copy over what has changed. Because of this, your first sync will take forever if you have a lot of data, but after that they get A LOT faster. And that is completely normal, and it's really even wanted. Why copy what didn't change, right?
Conclusion
Hopefully this helped you with your Unraid backup strategy! I know there are even more steps to have a REAL full disaster recovery system, but hey, each step towards that offsite unconnected backup is a step in the right direction, right??