Introduction
Hosting a website can feel expensive when you look at the cost to rent an entire server from any of the major (or minor) cloud hosting providers. But if you have a website that's based on static content (like the one you're on right now—this one is completely static), then it's a lot cheaper than you'd think!
With that in mind, I'll show you how to host a static website (like this one) using an S3 bucket and a CloudFront distribution, all on AWS.
Requirements
There are some things I'm not going to go over, but you will need to have set up before following this guide. I try to be as comprehensive as I can, but I also don't want to give so much information that it's overwhelming. Maybe someday I'll make smaller guides on all of these, but for now here's what you need:
- An AWS account
- A Route 53 domain name (this doesn't have to be in Route 53, but it's a lot easier if it is—and the one I'm using for an example will be in this guide)
- A Route 53 Hosted Zone (similar to the domain name, it doesn't have to be Route 53, but that's what we'll be using)
- A static website that you want to host
Cost Breakdown
Before diving into it, I want to make sure we're all on the same page, price-wise. Here is the breakdown of the costs:
| Item | Description | Cost |
|---|---|---|
| AWS Account | The account you use to keep track of all the resources that you're using | Free! |
| Route53 Domain Name | The domain name you'll be hosting your resources under I.E. benchtested.co, google.com | Varies by TLD (top-level domain) name (i.e., .com, .net, .ai, etc.) It's $15/year for a .com. The rest of the prices can be found Here |
| Route53 Hosted Zone | Basically a DNS provider. DNS is the map to your domain. | $0.50/month |
| Route53 Hosted Zone Queries | AWS likes to charge for everything they can track. This is one of those items. Every time someone queries your DNS, it's tracked and charged but it's pretty cheap per request. | ~$0.40 per million queries. Safe to plan on about $1/month for this, but it's almost always nothing unless you have a very popular site. |
| S3 Bucket | This is where you'll store all the files for your website | Free for the bucket (not for storage) |
| S3 Bucket Storage | AWS charges for how much storage you're using in your bucket. Depending on how much you plan on accessing your items, you can put them in different tiers. I prefer to just use standard, so that is what I'm basing costs on here. | $0.023 per GB per month. Most static websites will be under 5 GB, so planning around $1.15/month for this should be plenty. |
| S3 Item Access | AWS tracks each time an item is accessed. For us, this should just be GET requests for 99.99% of everything. | $0.0004 per 1000 GET requests so for 1 million requests per month, that's $0.40 |
| AWS SSL Certificate (non exportable) | This is what's used to encrypt the traffic, so you can get HTTPS on your website (modern browsers hardly even show non encrypted sites anymore so this one's important!) | Free! |
| Cloudfront distrobution | This is what is going to hook everything together. It takes the resources from the S3 bucket, the certificate from the certificate manager, and the domain name from Route 53 and "distributes" it as a website. | We're going to use the free tier, so free! |
As you can see each resource gets billed a little differently, so you can't really say it's going to cost X per month, or Y per year, since that isn't what is going to get taken out of your account annually. But, we can still get the "average" cost per month, and the total cost per year so it's easier to compare to different hosting methods. With that in mind, if we add the monthly costs together we get $3.05 per month, which would be $36.60 per year. Then we add the $15/year for the domain to that and we get:
- $51.60/year
- Which factors down to $3.40/month
I do still want to keep in mind here, that I like to overestimate when it comes to expenses, because that leads to a much better surprise than underestimating. No one is ever mad to pay less than projected. So I would expect the actual cost to be a bit less than that, especially when you are just starting out with a website and you don't have a lot of content, and you're not getting a lot of visits. In fact, other than the domain stuff, you'll probably be in the "free" zone for a lot of this stuff.
Setting It All Up
Gathering the assets
To get started with this, the first thing you need to do is get your content ready. That might be publishing a React or Angular app, or just pulling your static HTML/CSS/JS files down from GitHub, or whatever. For me, I set up a system where I create content in a semi-templated format, and then have Python compile it down to static content. Whatever the case, I recommend at this point you get all your content shaped how you want to deploy it, and just run a quick Python web server and click around to make sure it looks like you want it to look when it's served. In my experience, hosting in the method we're talking about usually produces very similar results to the basic Python web server.
To do that, navigate to whatever folder your content is set up in, and type the command:
python3 -m http.server 8080this command will launch a web server rooted at the folder that it's run in at port 8080 (if you change the port at the end, you can pretty much run it on whatever port you want, so long as your system isn't currently using it.)
If your website runs as expected, you should be good to move on to setting up your bucket!
Setting Up Your S3 Bucket
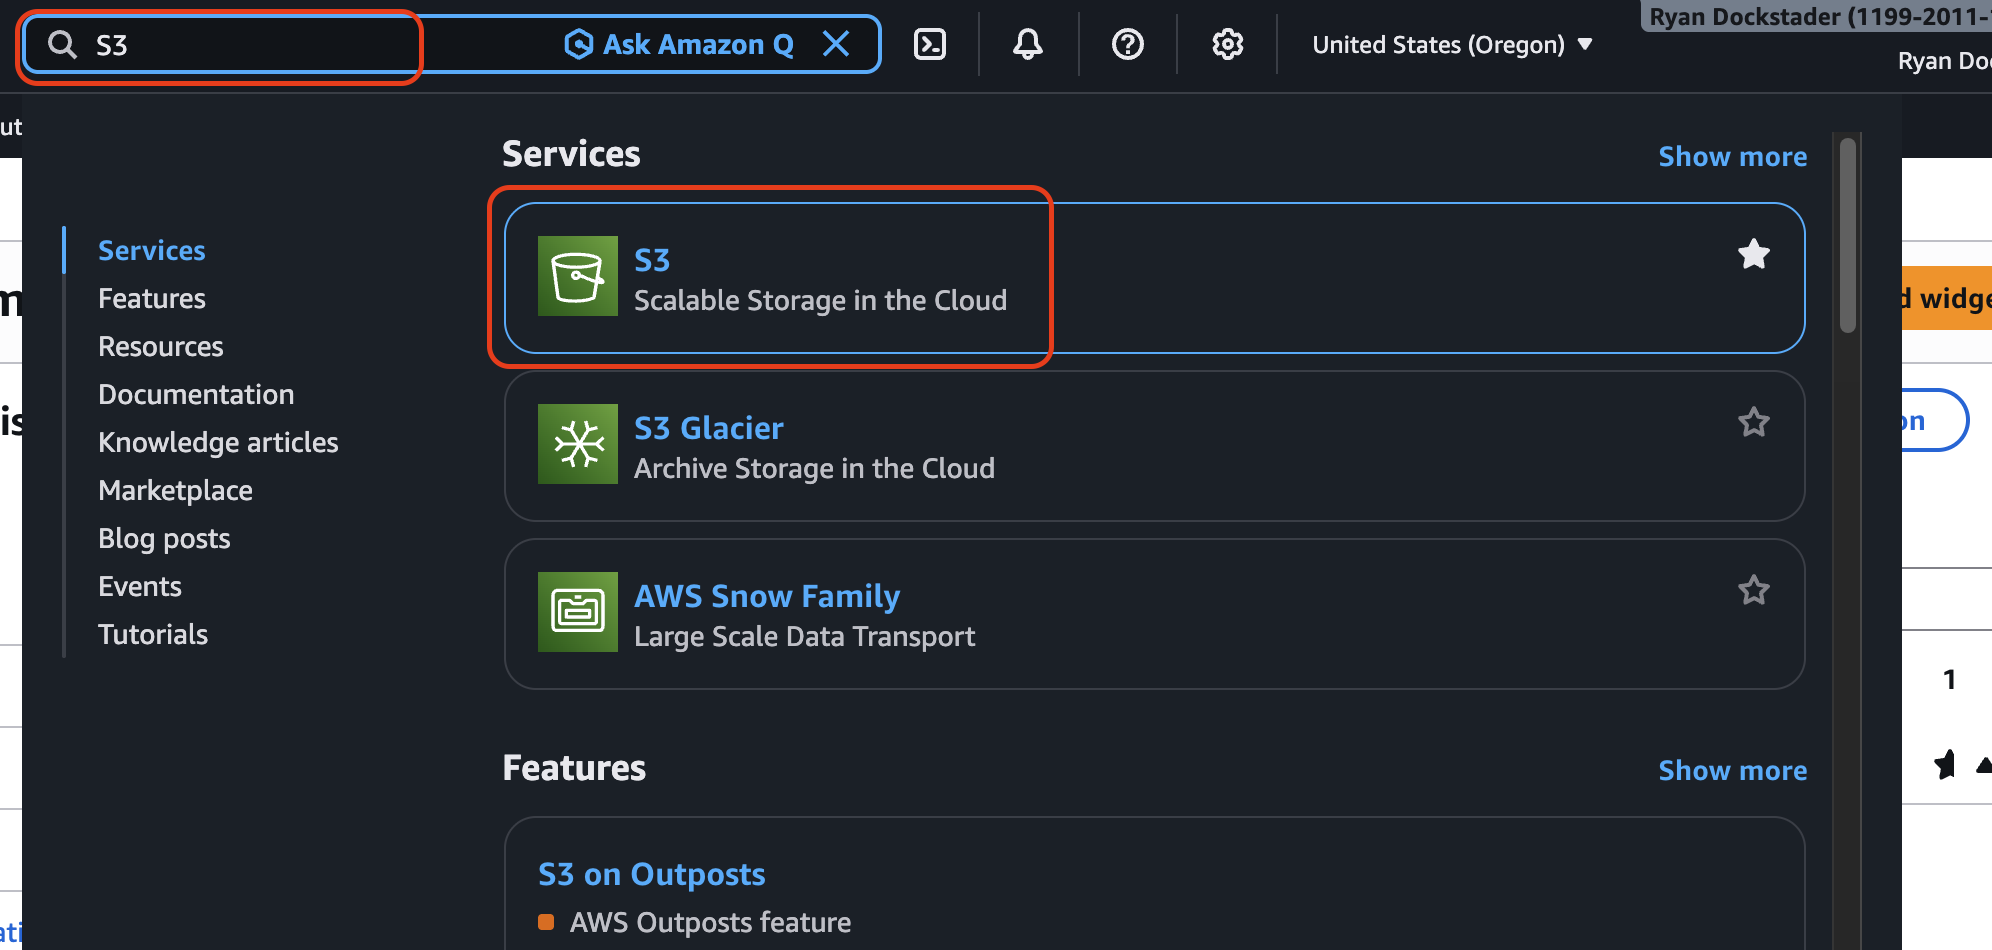
Now head over to AWS and login to your account. Then navigate to the S3 service manager. If you haven't ever been there, the easiest way to do this is to type S3 in the top search bar, and select the S3 option.
Once on the S3 home page, click the create bucket button
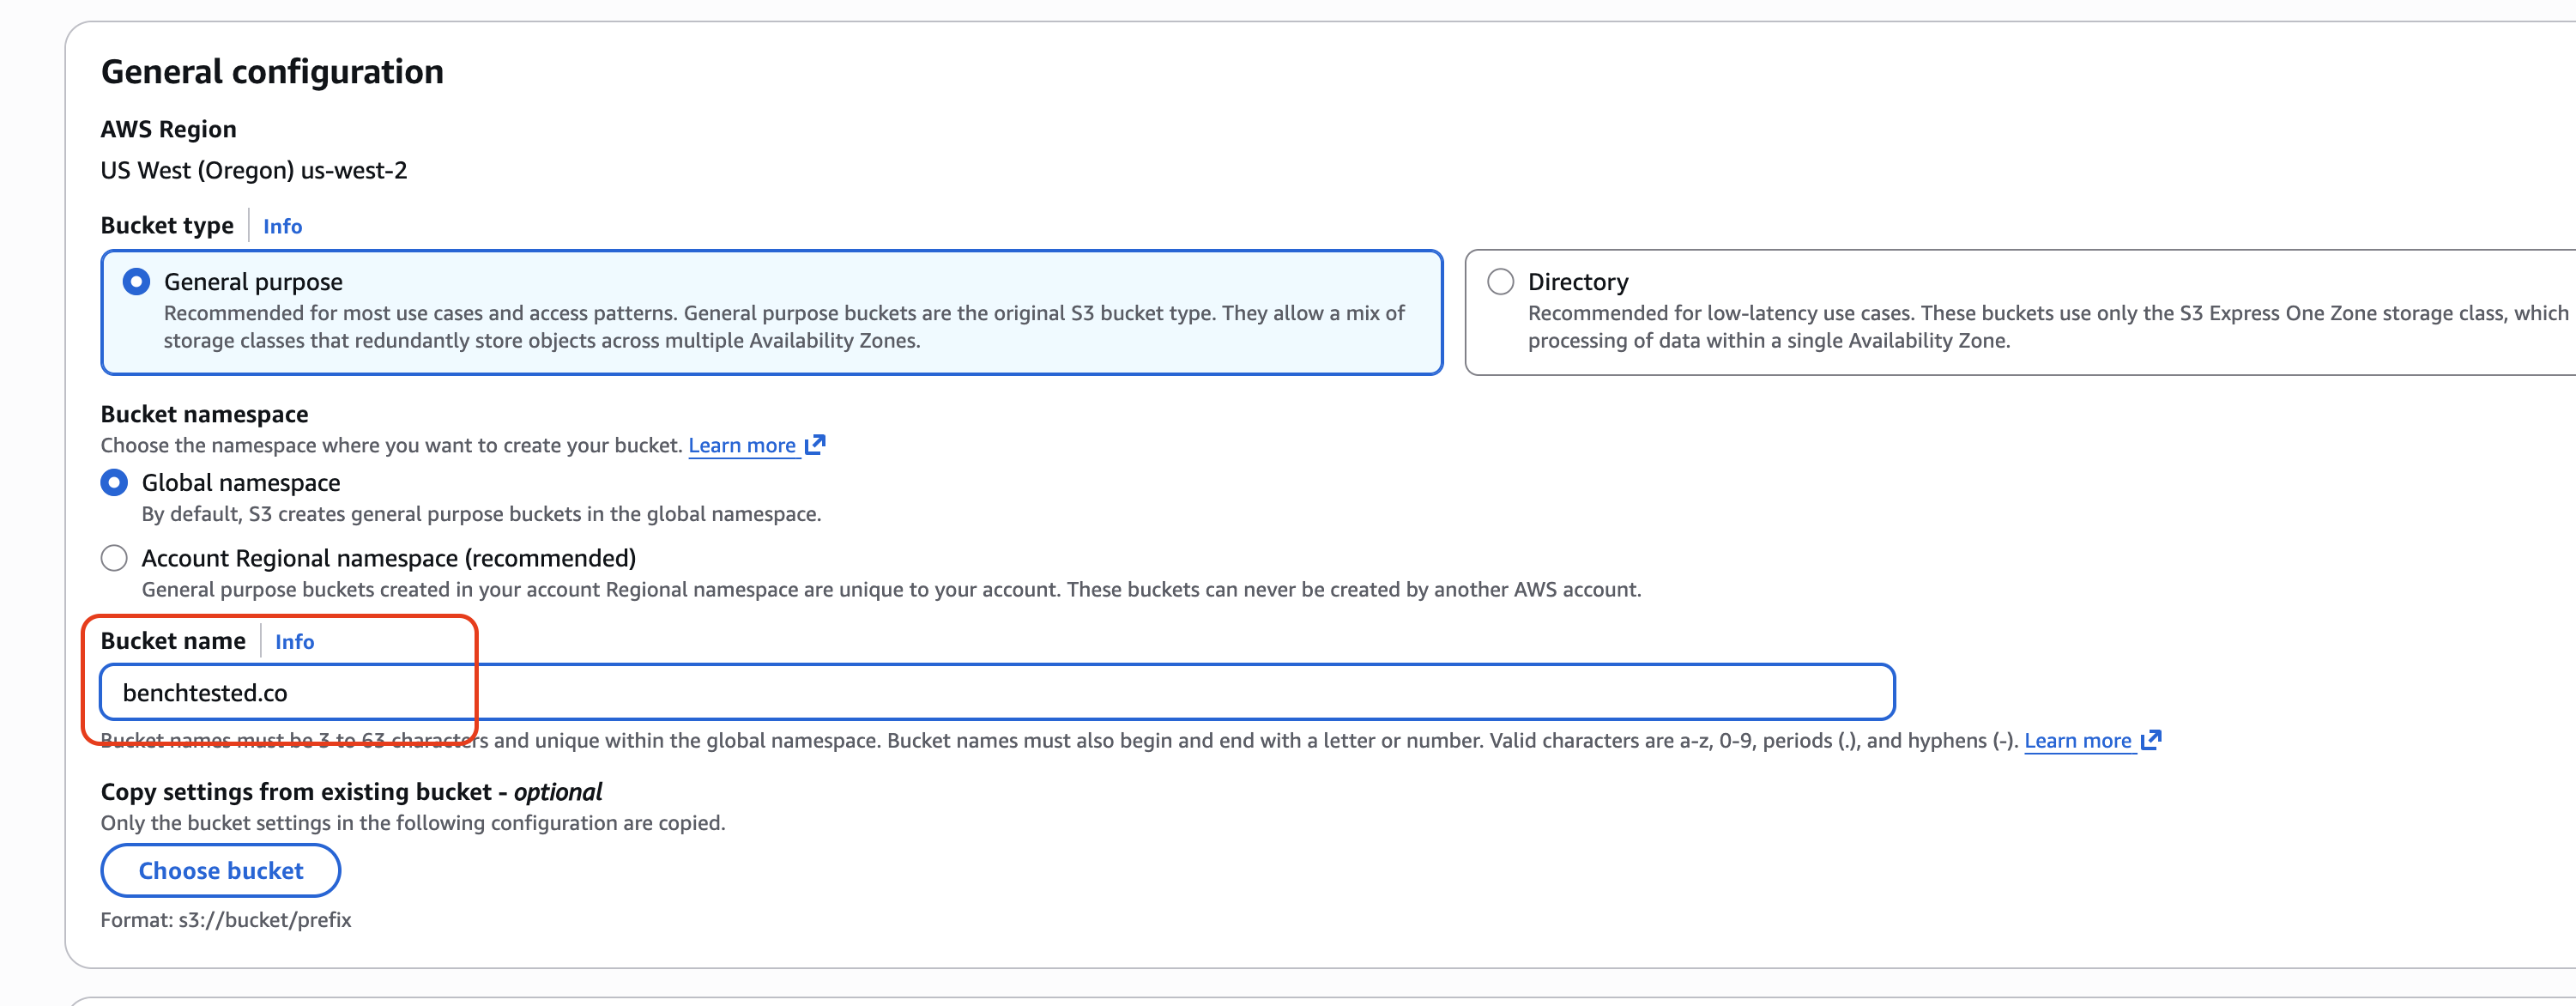
Give the bucket a name that matches the URL that you're going to host the bucket's content at. For me, I'm hosting it at the root of my website, so I'll put benchtested.co. You could also do a subdomain, like test.benchtested.co, or really whatever tickles your fancy.
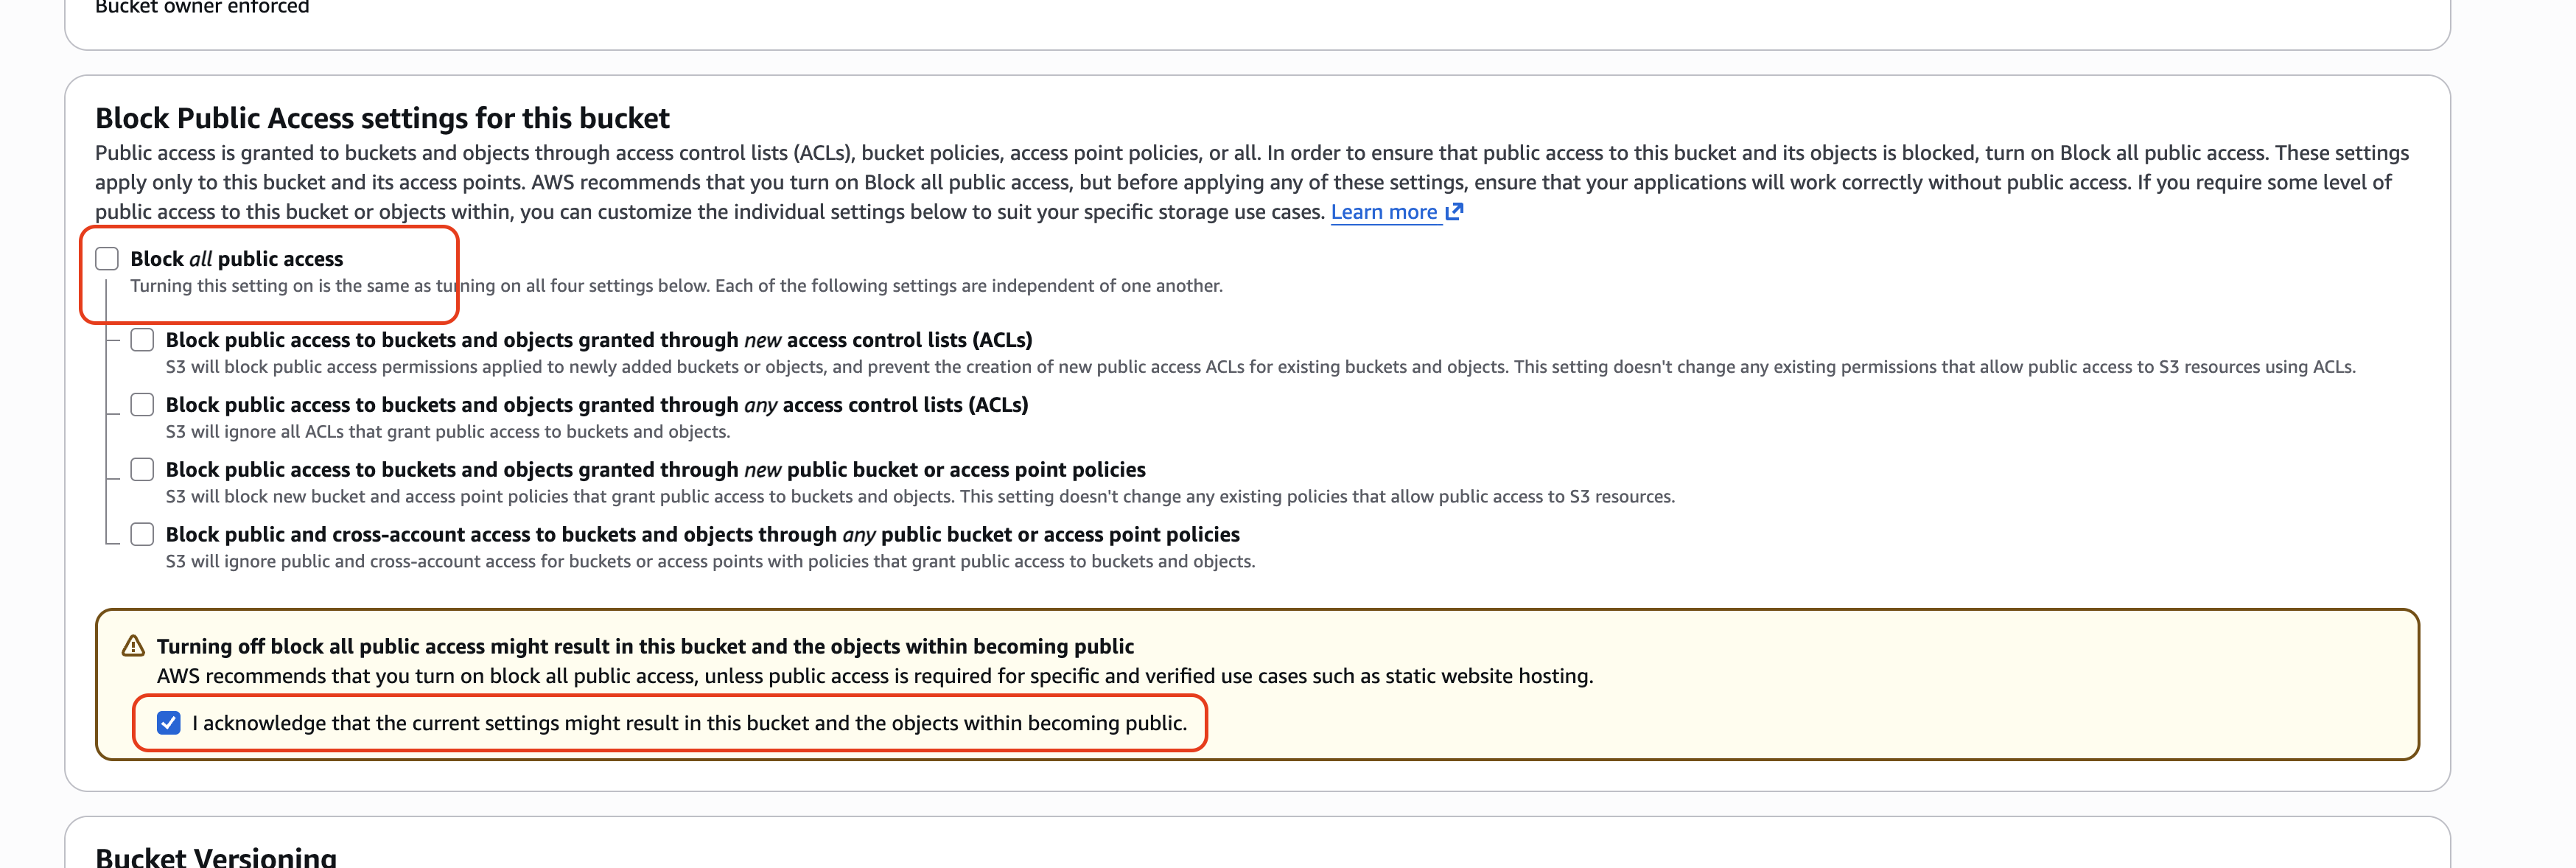
Then in the bucket policy, uncheck the box for "Block all public access." You'll also need to check the box acknowledging that this could allow objects in your bucket to be public.
With those settings, you're ready to click Create bucket. With the bucket created, we need to modify the settings a little bit more, and then we'll be ready to upload the website to the bucket.
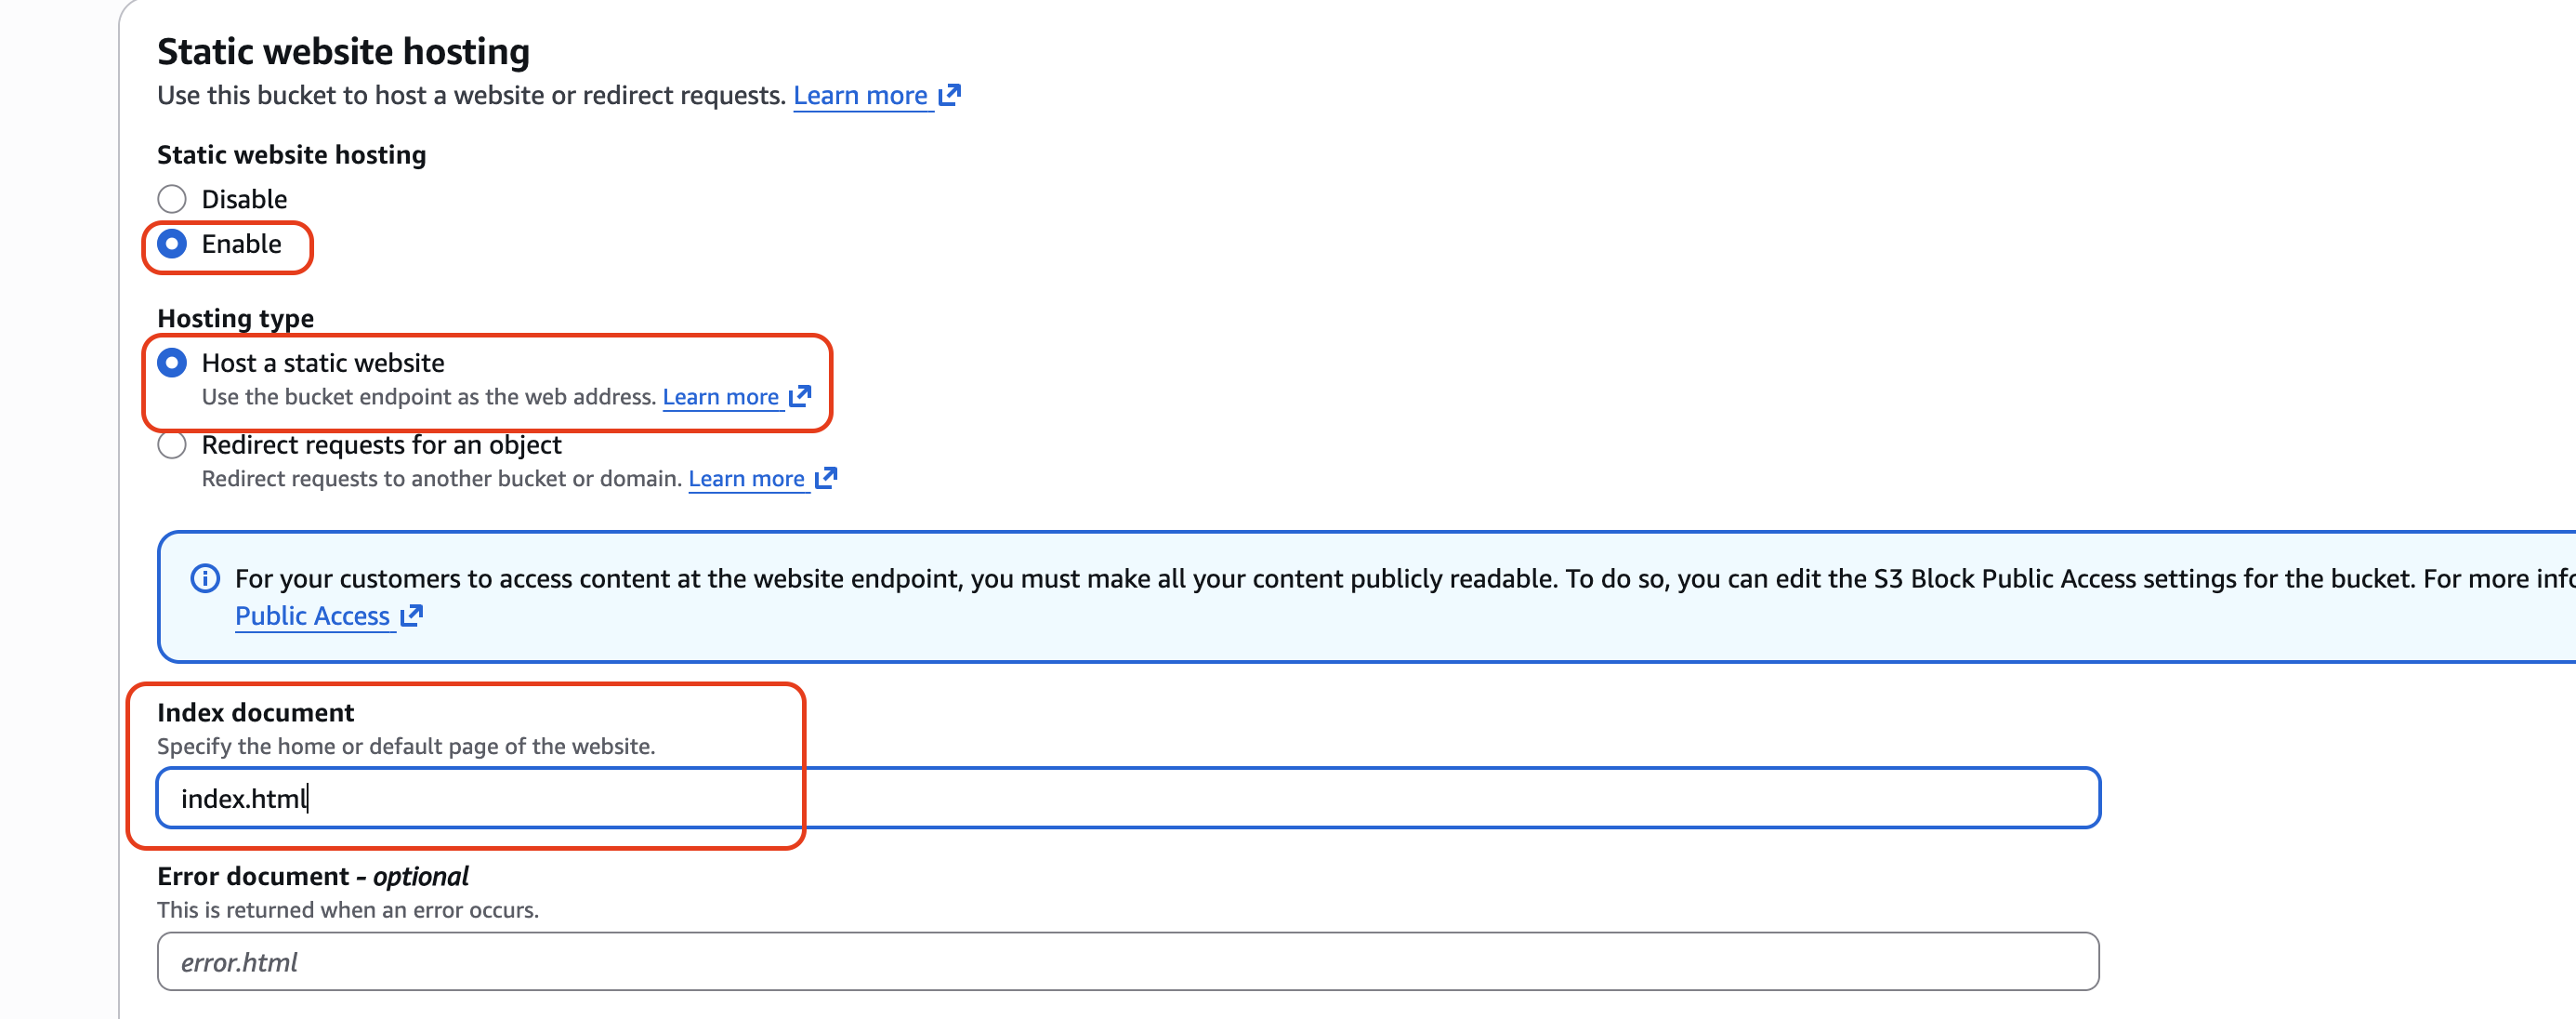
Access the bucket, and navigate to the properties panel. Once there, scroll all the way to the bottom and click the Edit button on the "Static website hosting" option.

With the edit screen open, click Enable for static website hosting. This will expand the options shown on the screen. After you click enable, make sure that it's set to host static files, and that the entry point is index.html. Then scroll down and hit Save changes.
Back on the main page, you can take note of the bucket URL. You can even click on it at this point but unfortunately you'll get a 403 Forbidden error, because the objects in your bucket haven't been uploaded, and even if they had, we haven't given public users read access. So we'll do that next.
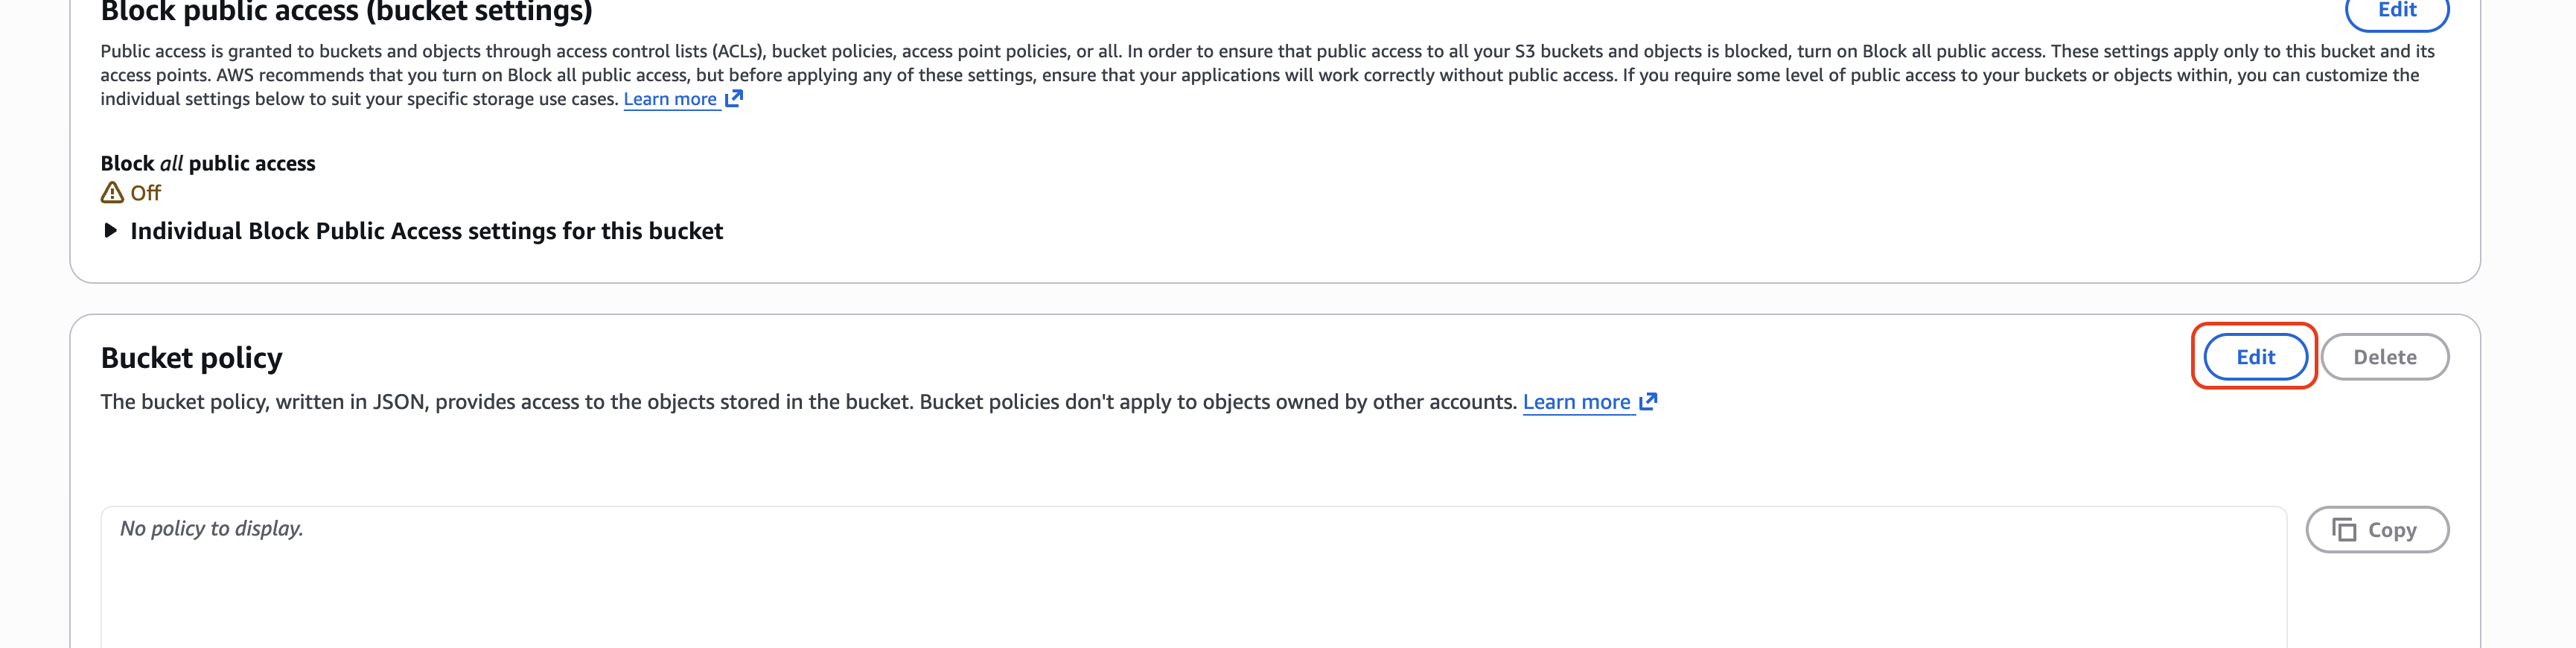
To do that, navigate to the Permissions page and scroll to the Bucket policy section and click Edit.
With the policy editor open, you'll need to enter the following policy, modifying the ARN to the ARN of your bucket.
{
    "Version": "2012-10-17",
    "Statement": [
        {
            "Sid": "PublicReadForWebsite",
            "Effect": "Allow",
            "Principal": "*",
            "Action": "s3:GetObject",
            "Resource": "arn:aws:s3:::BUCKET_NAME/*"
        }
    ]
}
If you don't know what an ARN is, no worries—it just stands for Amazon Resource Name, and it's a unique identifier that Amazon assigns to all of its resources. Amazon is pretty friendly here, and puts the ARN that you can copy right at the top of the policy editor.
With that policy in place, if you navigate to your S3 website URL, your website should now be working as expected! You could stop here, but you'll notice that your domain name isn't exactly the best, and that's where the rest of the steps come in.
Getting an AWS certificate
Important Note: You can skip this step and just generate your certificate when you create the CloudFront distribution in the next step, but you'll have less control over the certificate creation.
Before we go and create the CloudFront distribution, it's a good idea to get your certificate set up. You could also do this from the CloudFront creation, but for my brain it's a lot easier to separate the two steps.
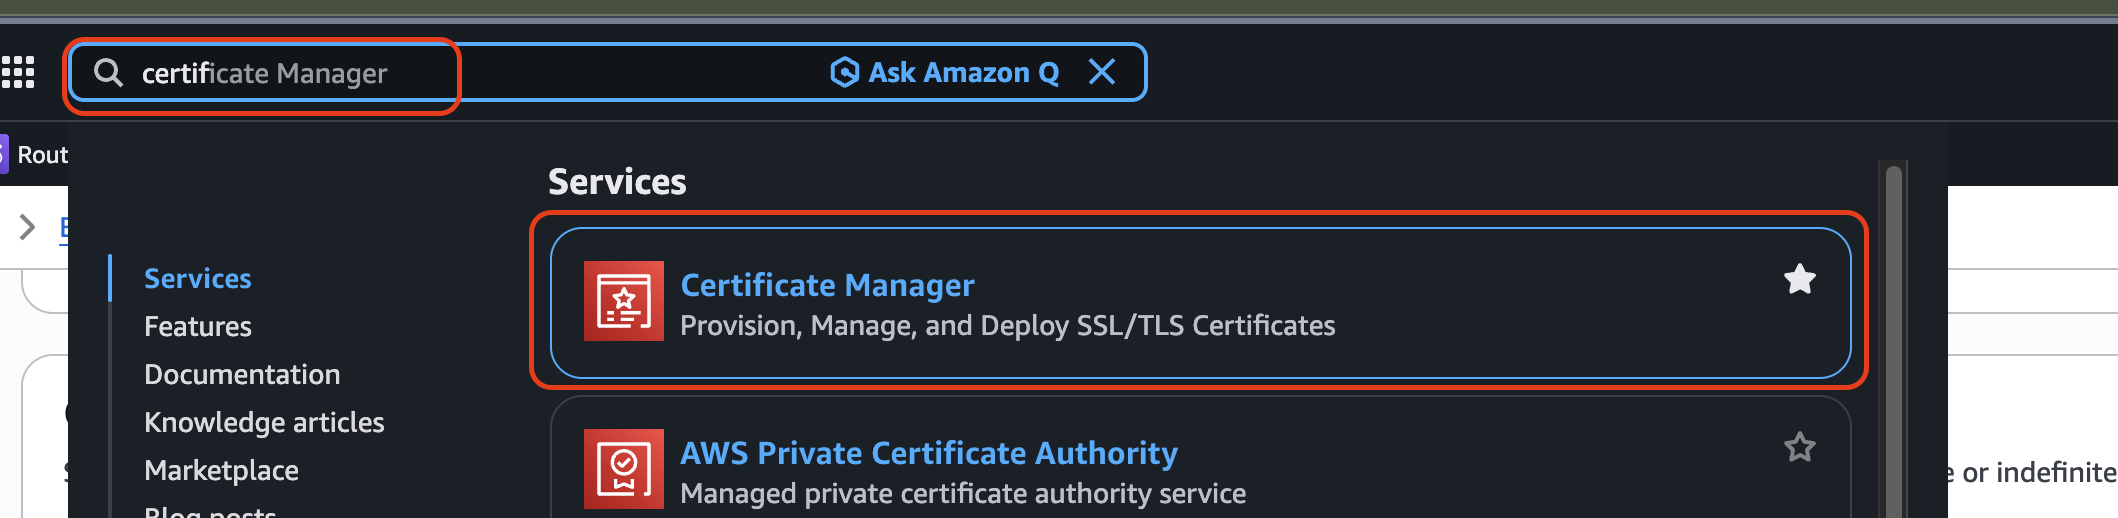
To create the certificate, go to the Certificate Manager the same we we went to S3. Type certificates in the search bar, and select the correct option from the search (if you notice the highlighted star in the screenshot, that's because I added these services to my "favorites", so they show in the menu bar under the top search)
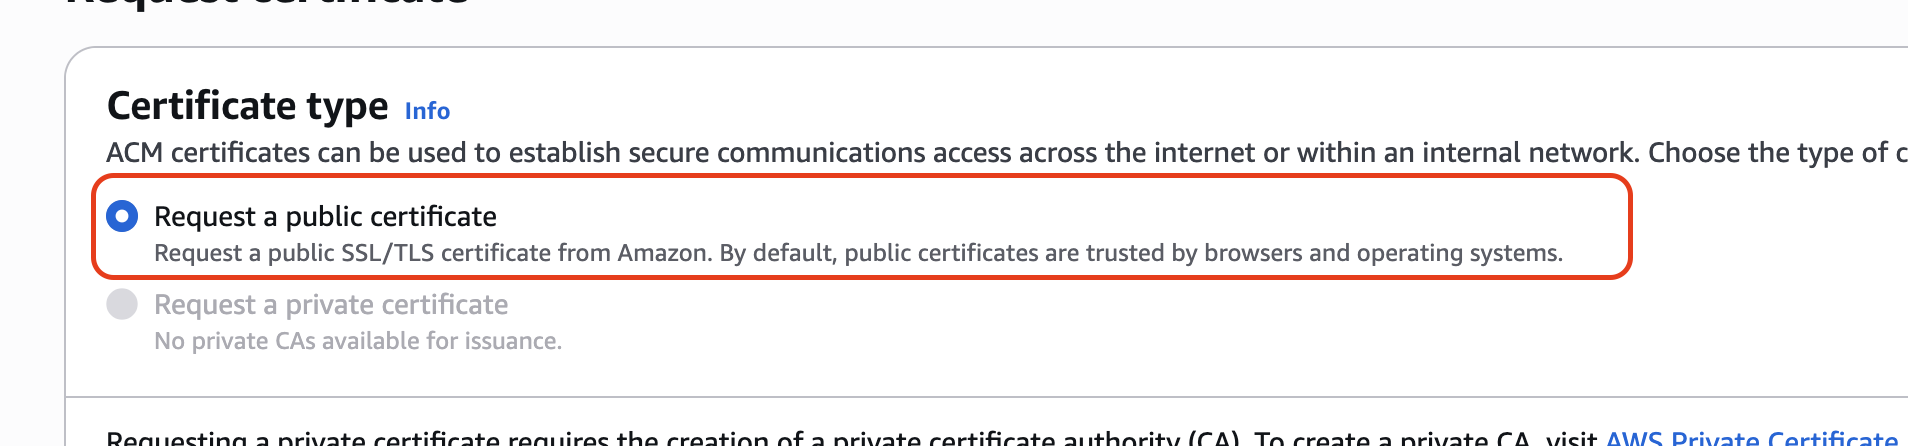
Once there, click request a certificate
Choose public on the first page
Add your FQDN (Fully Qualified Domain Name) on the second page. This is the full domain name you want to use, such as test.benchtested.com if you want to use a subdomain, or benchtested.co if you want it at your root domain. For me, I generally prefer what's called a wildcard certificate which is *.benchtested.co, which will work for any subdomain. That way you don't have to manage a bunch of separate certificates if you have a lot of subdomains, like if you wanted to do blog.benchtested.co, store.benchtested.co, and benchtested.co as separate sites.
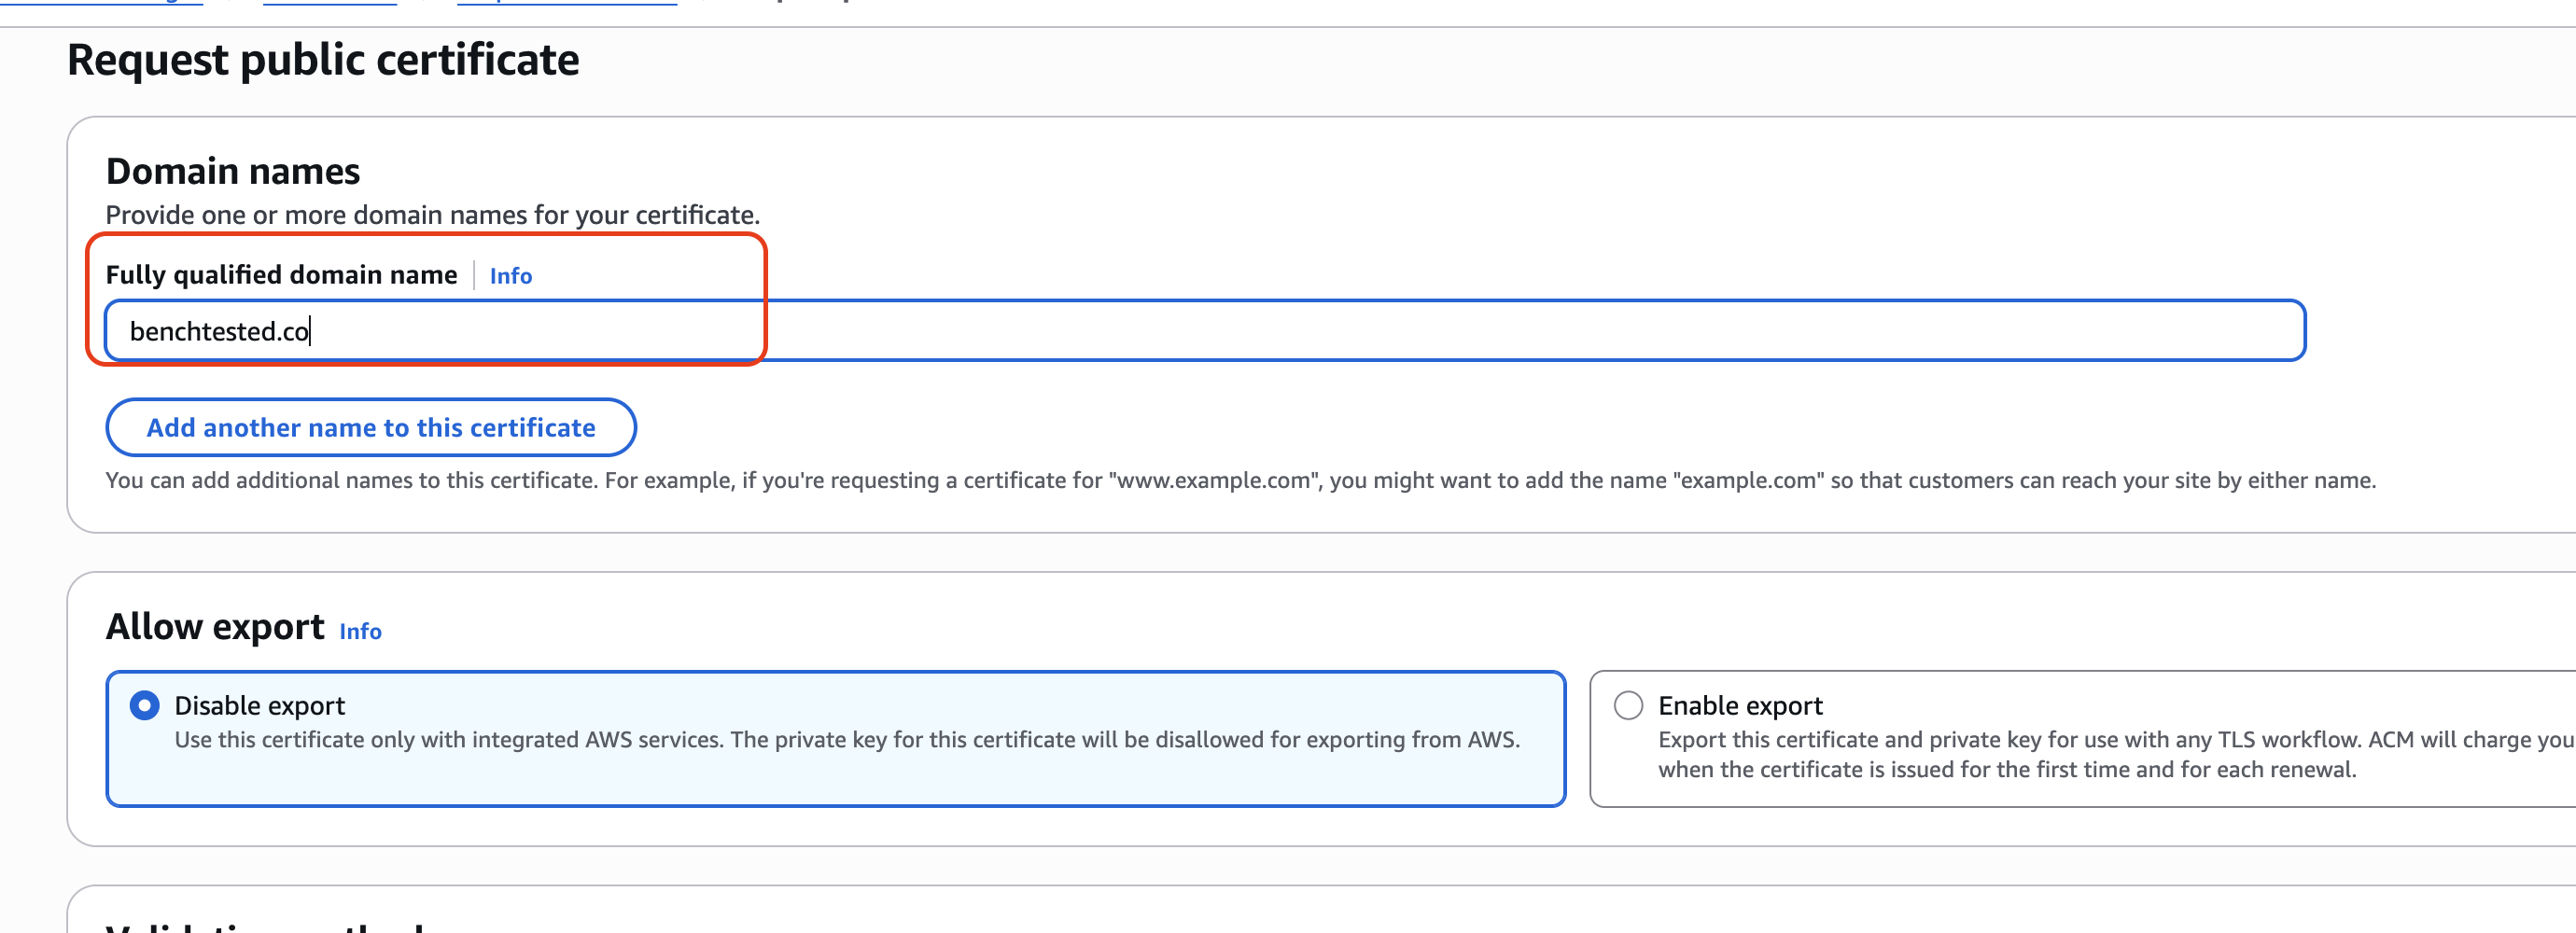
With your FQDN filled out, you can scroll to the bottom and hit request. After you setup the request, you'll have to validate you own the domain. This is super easy if you're using Route 53: all you have to do is open the request, go to the Domains section, and click Create Records in Route 53. Then just select the matching domain and hit Create Records, and AWS will take care of the rest for you.

Once your certificate lists as issued, you're ready to move on to the CloudFront distribution!
CloudFront Distribution
Head over to CloudFront, and click the create a new distribution button.
On the first page, if this is a brand new website distribution, just hit free! If you run into limits you can always upgrade later.
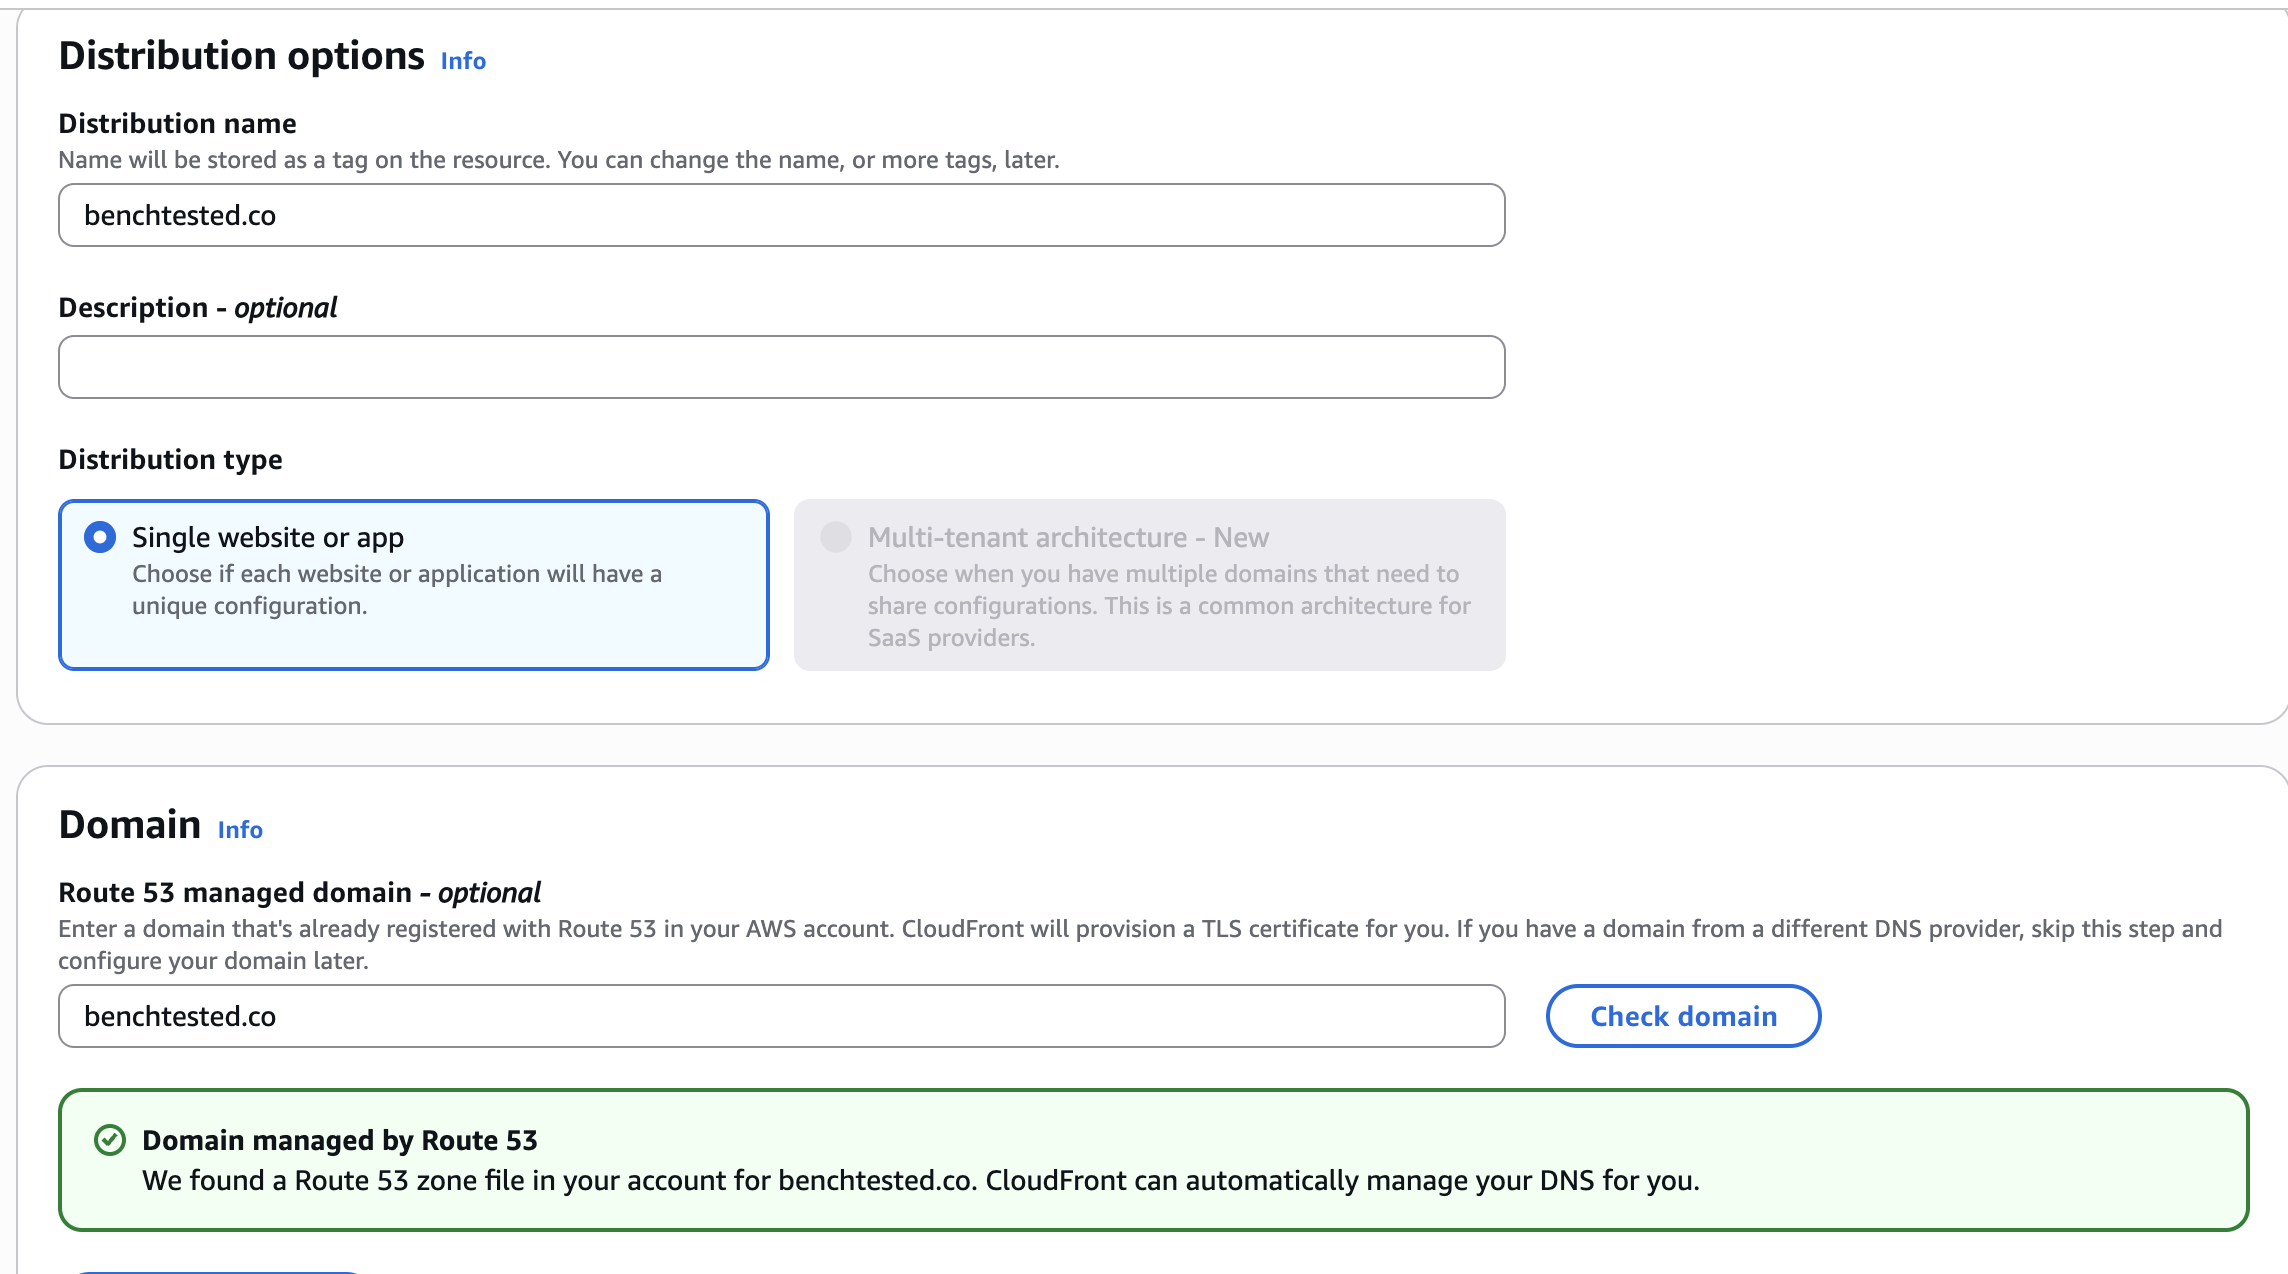
On the second page, give it a name, a description, and select the domain
On the third page, select S3, and then browse to and select the bucket you set up for the website hosting earlier. Once you select that, you'll see a yellow message that says you should use the website URL. Click the button accepting that, and you should now see 'website' in the S3 URL.

On the fourth page, leave everything default and hit Next.

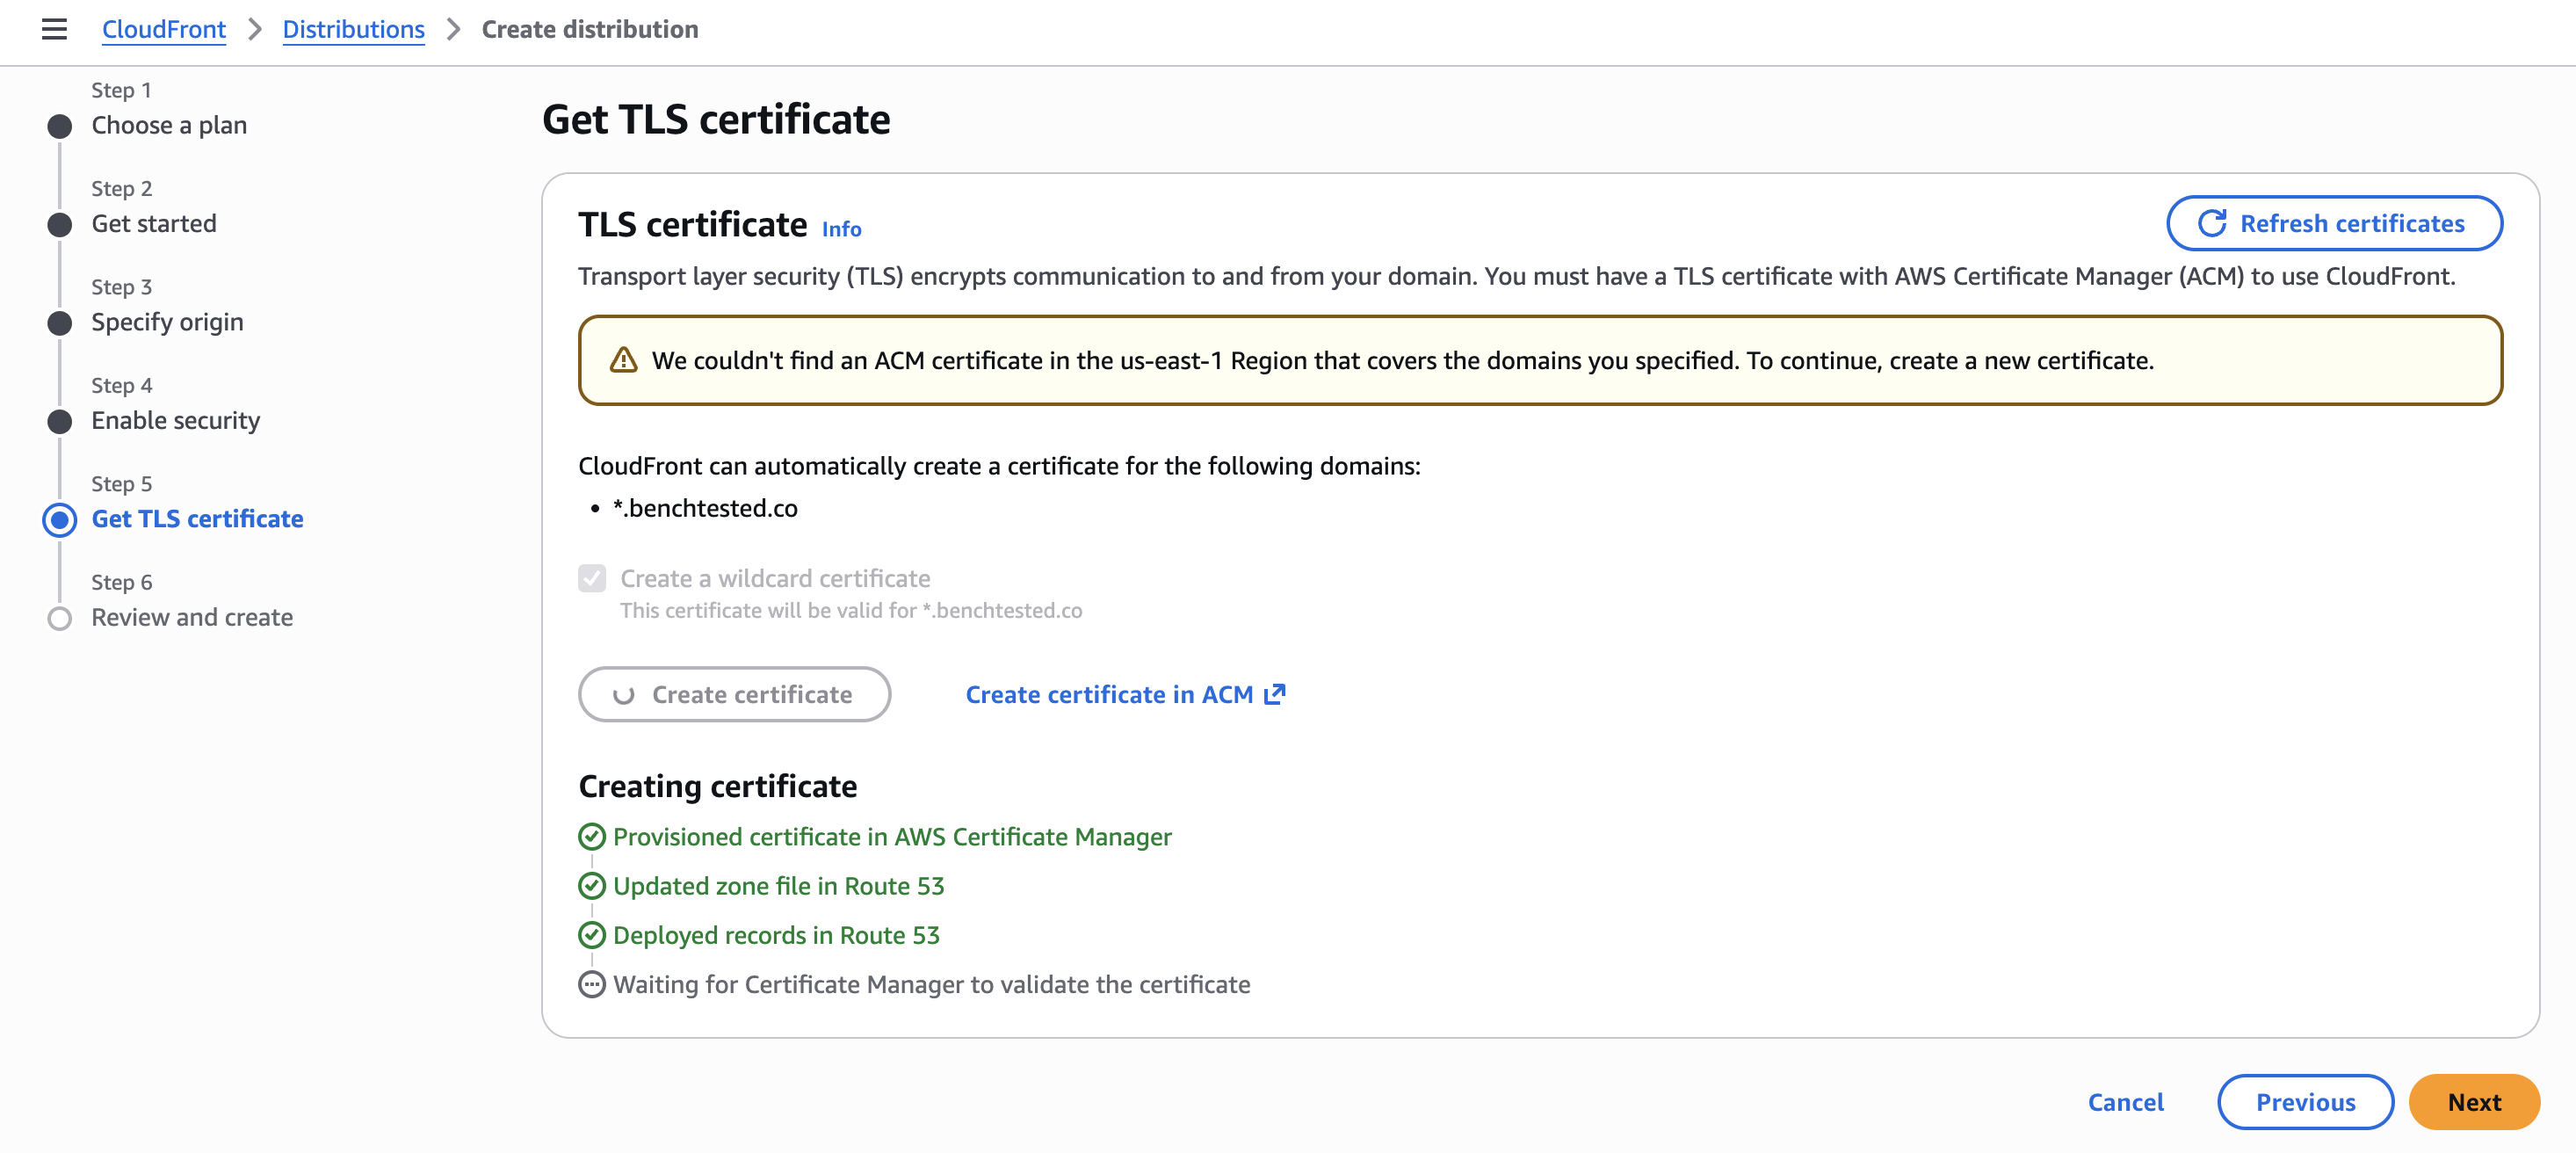
On the fifth page, if you haven't created a certificate you can create one here. Just click the create certificate option, and since you selected a Route 53 domain earlier, it'll just automatically create it. If you're creating a root website, I recommend making it a wildcard certificate as well (just by checking the box), so that you can use it on any other subdomains you would like to use (like blog.example.com, links.example.com, etc).
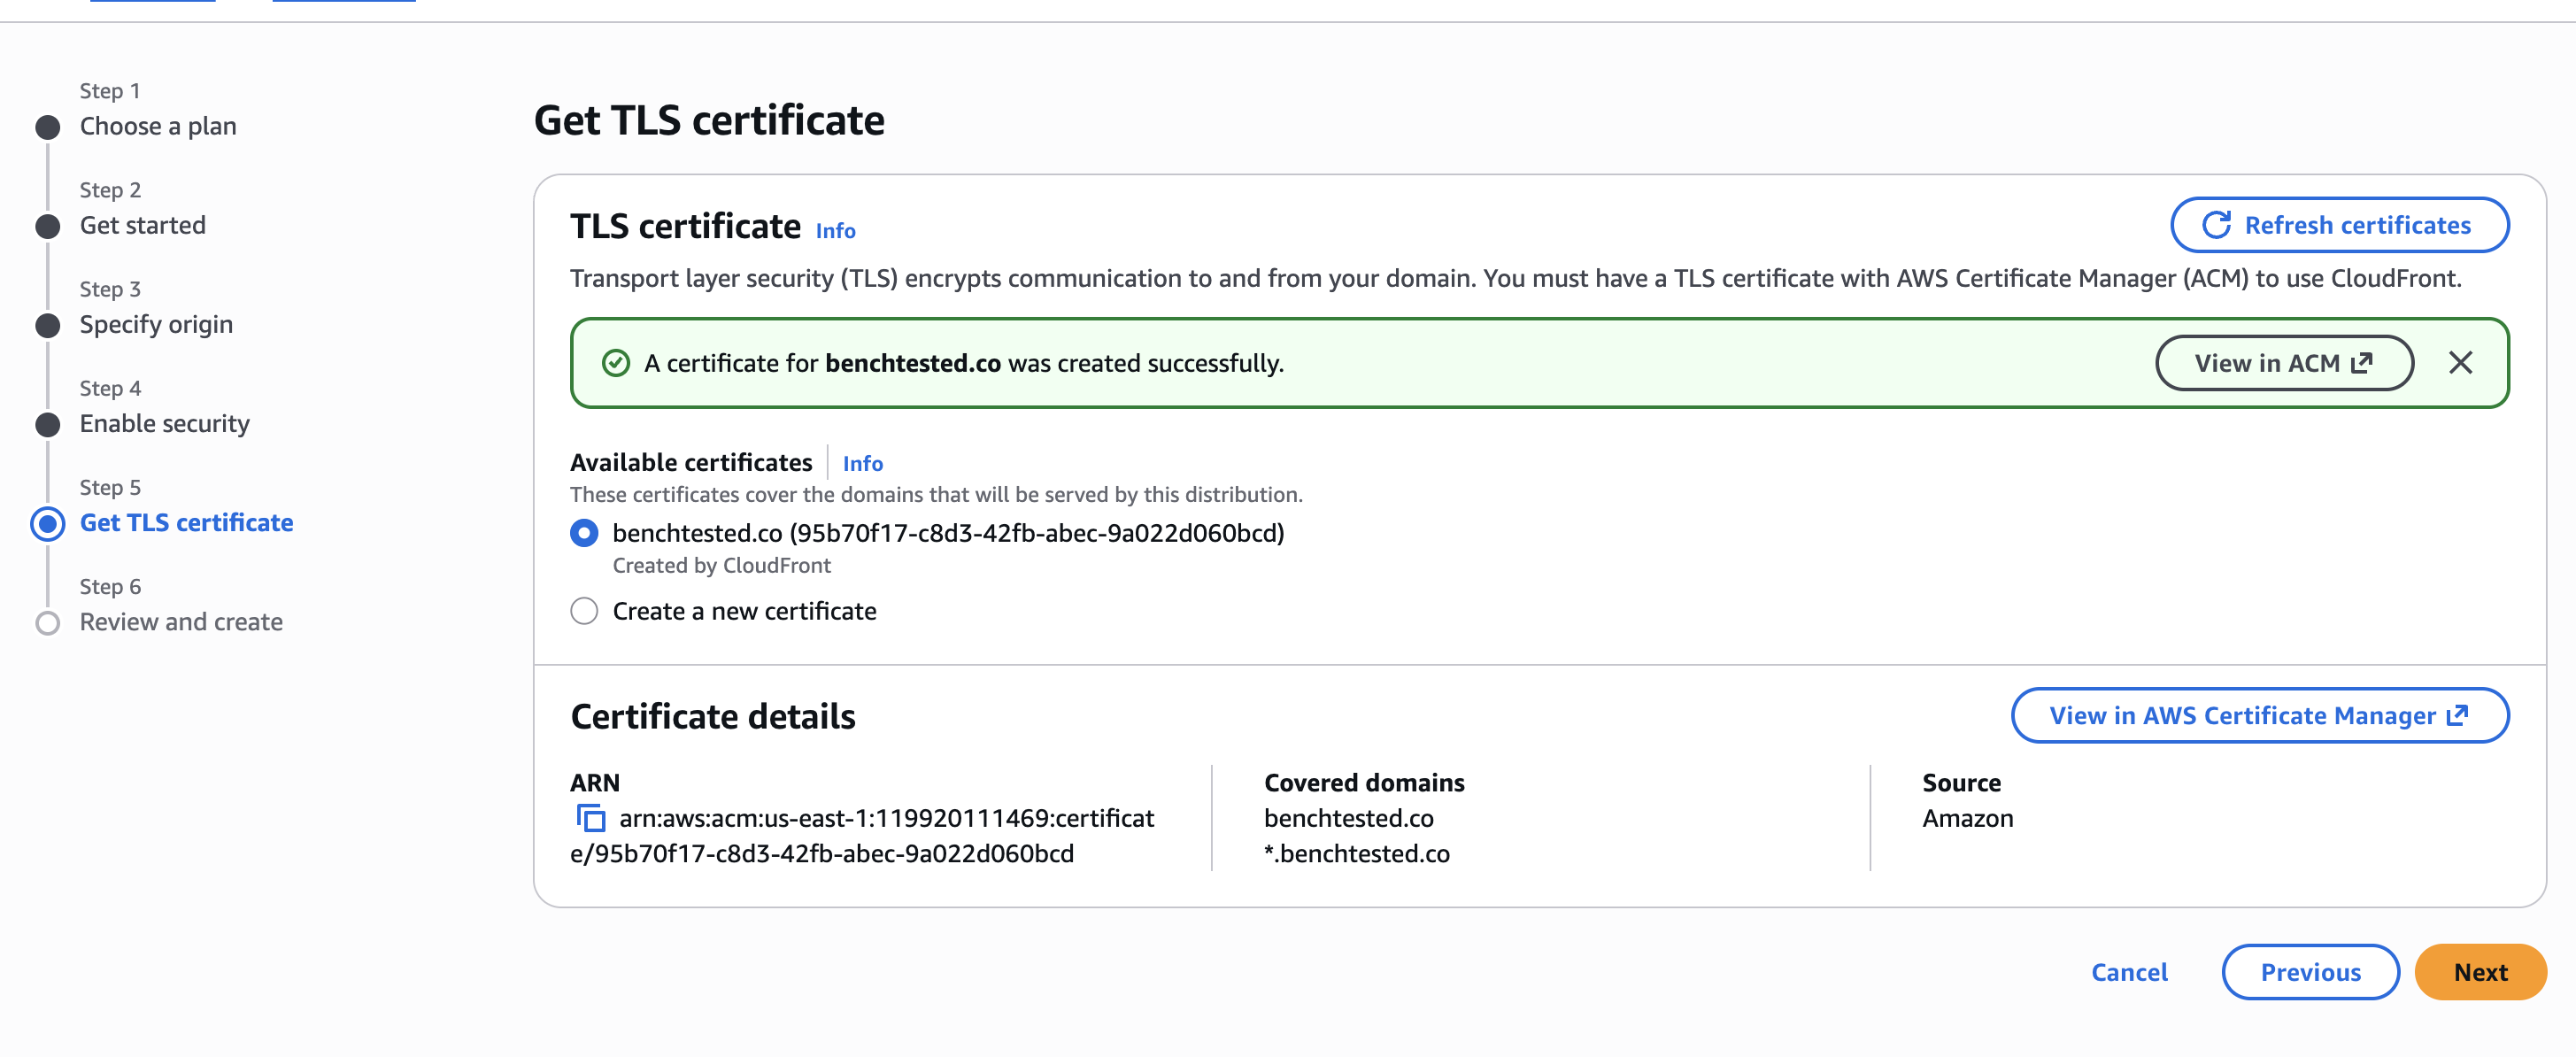
If you have created a certificate, just select your existing certificate and you should be good to go!
On the final page, make sure it all looks correct and hit Finish.
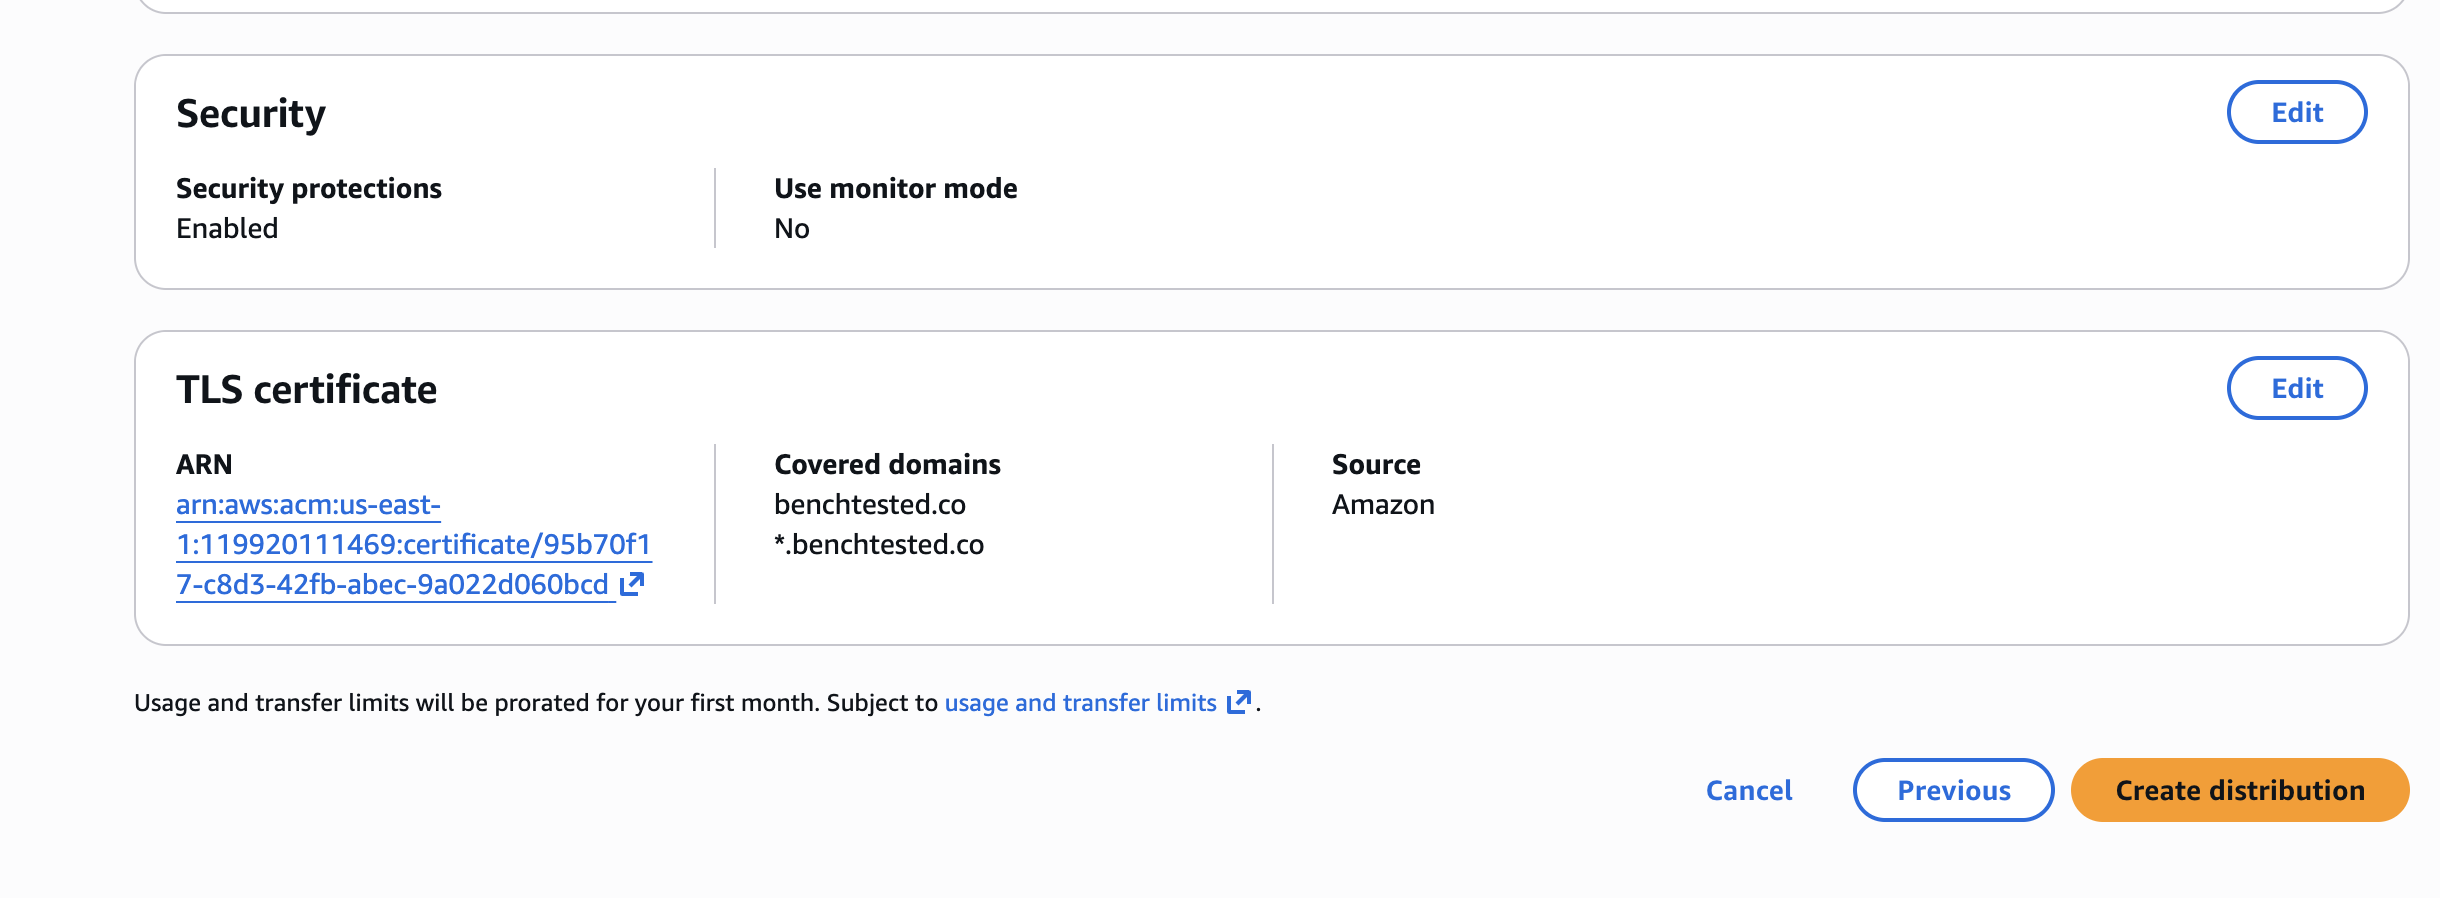
On the page it takes you to after you hit Finish, you should see the distribution name and URL in the top box. Over on the right side, it's likely that it'll say something like "deploying." Sometimes it takes a while for AWS to set up the CloudFront distribution so you'll just have to wait until it no longer says deploying. Once it's done though, copy the CloudFront URL, and make sure you can see your website as expected at that URL. If you can, you're almost done! We just need to add the DNS record for your new CloudFront distribution.

Adding the CloudFront DNS Record to Route 53
Head over to Route 53, and find your hosted zone again.
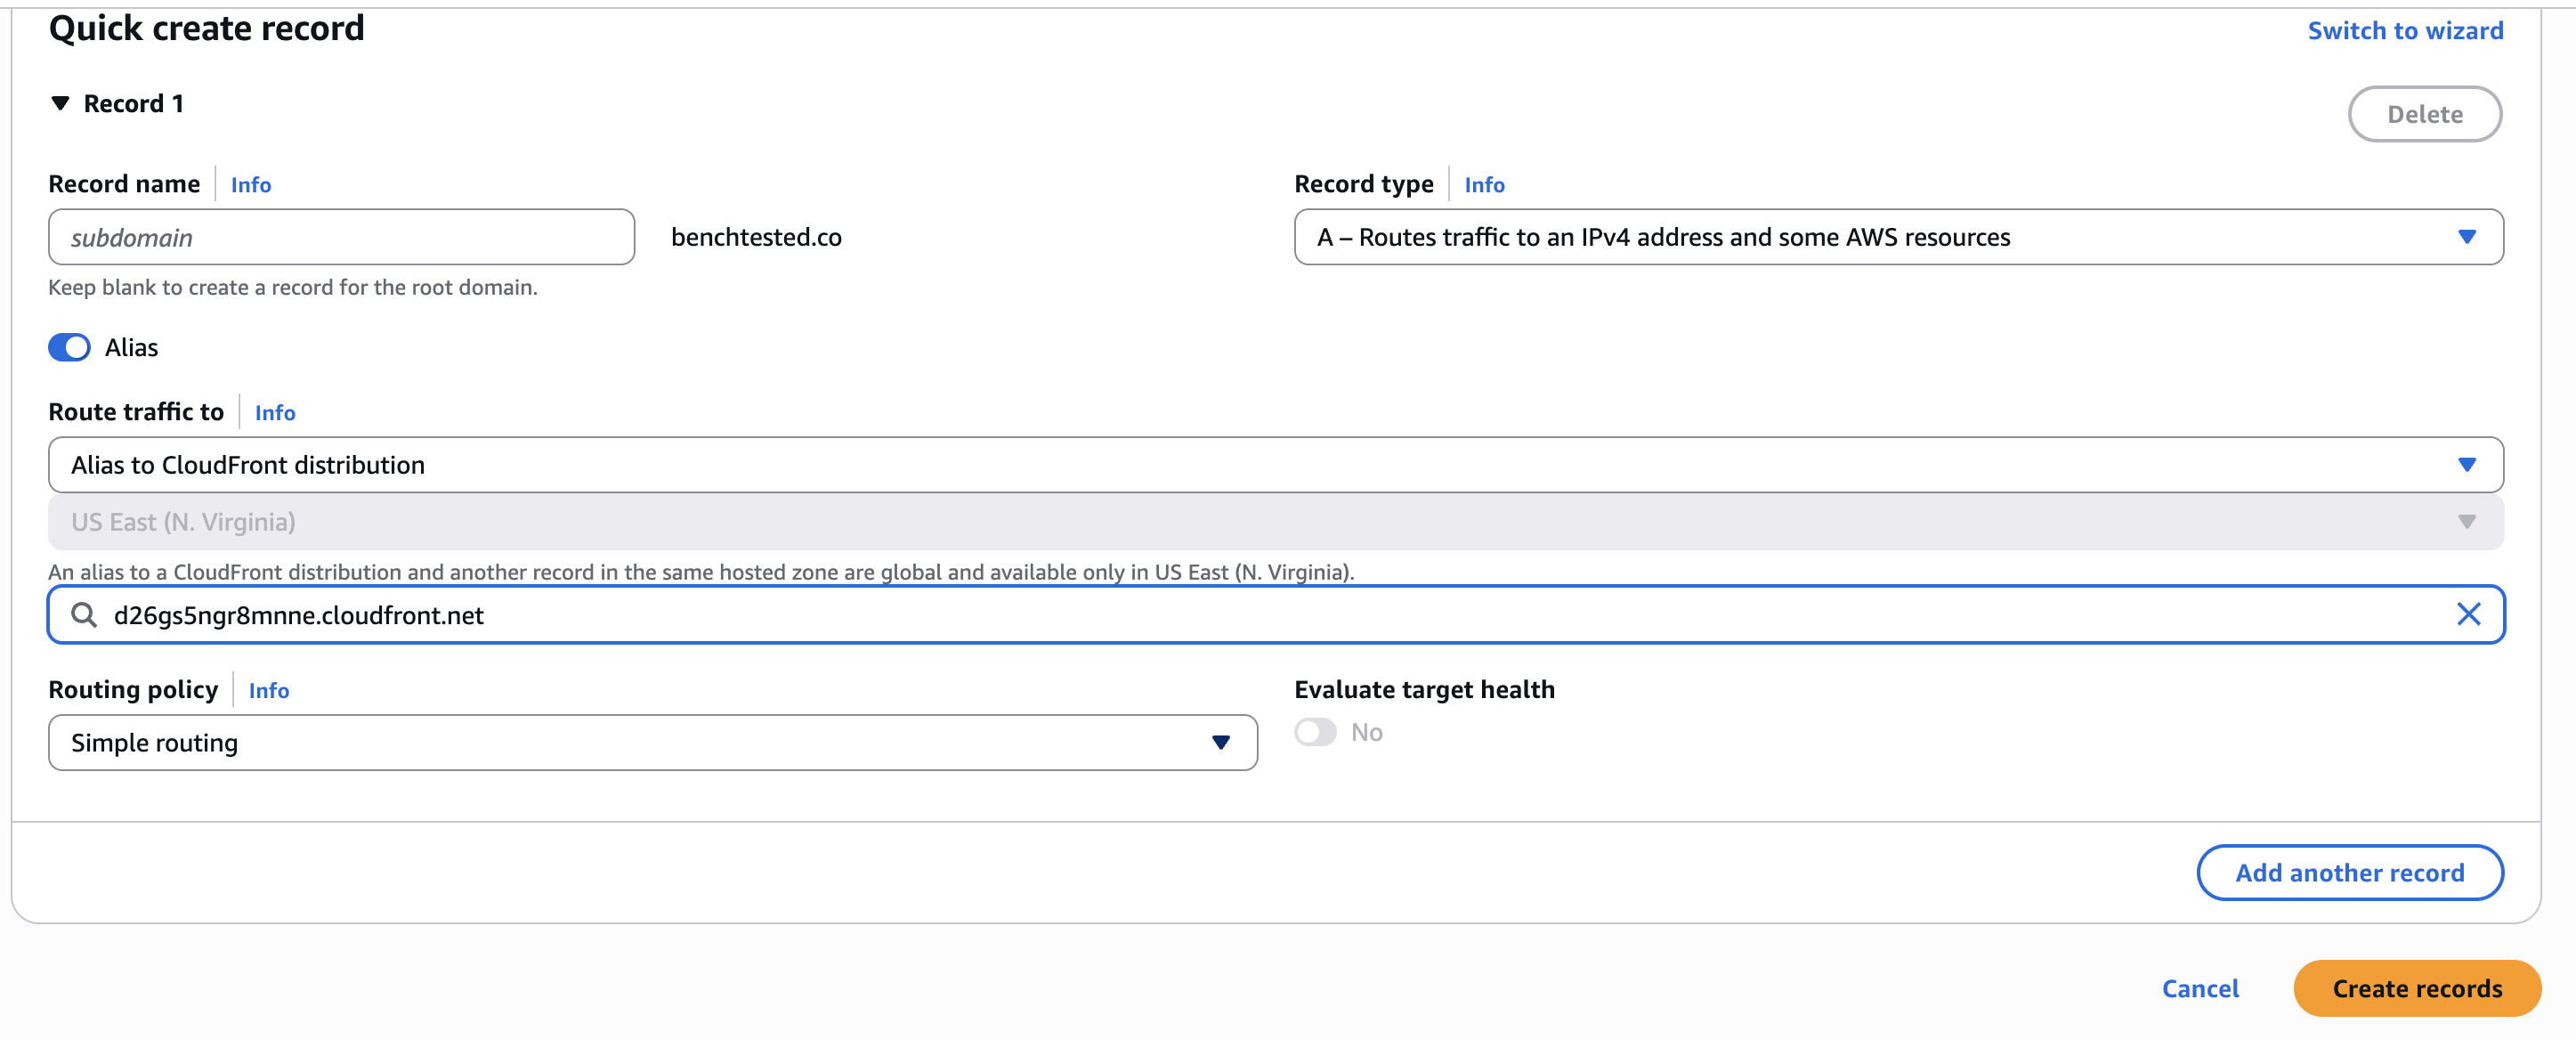
Once there, click the create record button
On the create record page, enter your subdomain (if you're doing it for the root like I am, you'll just leave it blank). Make sure it's set to an A record, and then click the slider to make it an alias. In the endpoint box, search for CloudFront and select the option that comes up. Then, click the next dropdown and select the CloudFront distribution you created. With that done, hit Create record. Here again, DNS propagation can take a while. So you'll just have to let it sit for a while. After 5 or so minutes, check your website and you should see your page at your proper domain now! (If not, it's a good idea to try it on a different device, and on a different network if possible. I usually just disconnect my phone from WiFi, and pull up the website there.)
That's it, you're done!
If you made it this far, you should have a low-cost, static website! Congrats, and I hope your website gets many views and you're able to accomplish whatever you were trying to with it.